
Ready to take your website to the next level with eye-catching effects?
Parallax scrolling adds depth and movement, making your site stand out.
It’s an effective way to add interest to a page without getting in the way of your core message.
Whether you’re using the free or pro version of Elementor, parallax effects require minimal effort or expertise.
In this guide, we’ll walk you through how to create an Elementor parallax effect step-by-step
You’ll see just how easy it is to transform your website into a more dynamic and engaging experience.
Stick around to discover all the tips, tricks, and tools you’ll need to make your site pop with parallax!
Before we dive in, let’s quickly discuss the types of parallax effects you can use.
7 Main Types of Parallax Effects
You can use a range of parallax effects to boost visual appeal and engage your audience.
A great example is Firewatch Games, which creatively combines multiple parallax effects to tell an engaging story.

They effectively use popular parallax techniques to captivate visitors.
Speaking of popular techniques, here are some of the most common types of parallax effect.
- Vertical parallax scrolling: The background moves at a different speed than the foreground as you scroll down the page. This creates a sense of depth, perfect for background images or sections.
- Horizontal parallax scrolling: Similar to vertical scrolling, but the movement happens horizontally. Use this for images or sliders that move as you navigate across the site.
- Mouse-based parallax: Elements move in response to your mouse movements, creating an interactive experience. It’s ideal for hero sections or landing pages to grab attention.
- Foreground and background parallax: Multiple layers (foreground and background) move at different speeds, creating a more complex parallax effect.
- 2D/3D parallax: Simulate a 3D effect by having layers move in different directions and speeds. It’s great for portfolios or gaming sites where visual impact is key.
- Video parallax: Move background videos at a different speed or keep them fixed as you scroll through content. This adds dynamic motion to the background, ideal for storytelling or showcasing products.
- Parallax with CSS: Custom CSS allows for flexible parallax effects, giving you more control. If you’re a developer, this is a great way to implement parallax without relying on plugins.
These are just some of the parallax effects you can apply, and there are plenty of ways to achieve your goals.
Fortunately, Elementor makes it easy to create most parallax effects effortlessly.
Let’s dive into the “how.”
Create Parallax Effects With Elementor
Creating parallax effects with the Elementor page builder is surprisingly simple.
Whether you’re aiming for a basic background parallax effect or something more complex like a 3D impact, Elementor has you covered.
If you want to see these effects in action, this short video showcases stunning graphics.
Let’s start with what you can do using the free version of Elementor.
Creating Parallax with Elementor (For Free)
You can follow this tutorial on your live site if you like, but we recommend setting up a test site to avoid any potential hiccups.
We managed to create a blank test site in under 60 seconds using the ZipWP AI tool.
It’s a time-saving solution perfect for testing purposes, and the best part—it’s completely free.
Ready to dive into creating your parallax effect?
Open Your Page With Elementor
To create parallax effects with Elementor, you can either use an existing page or create a new one.
Start by navigating to Pages > Add New Page.
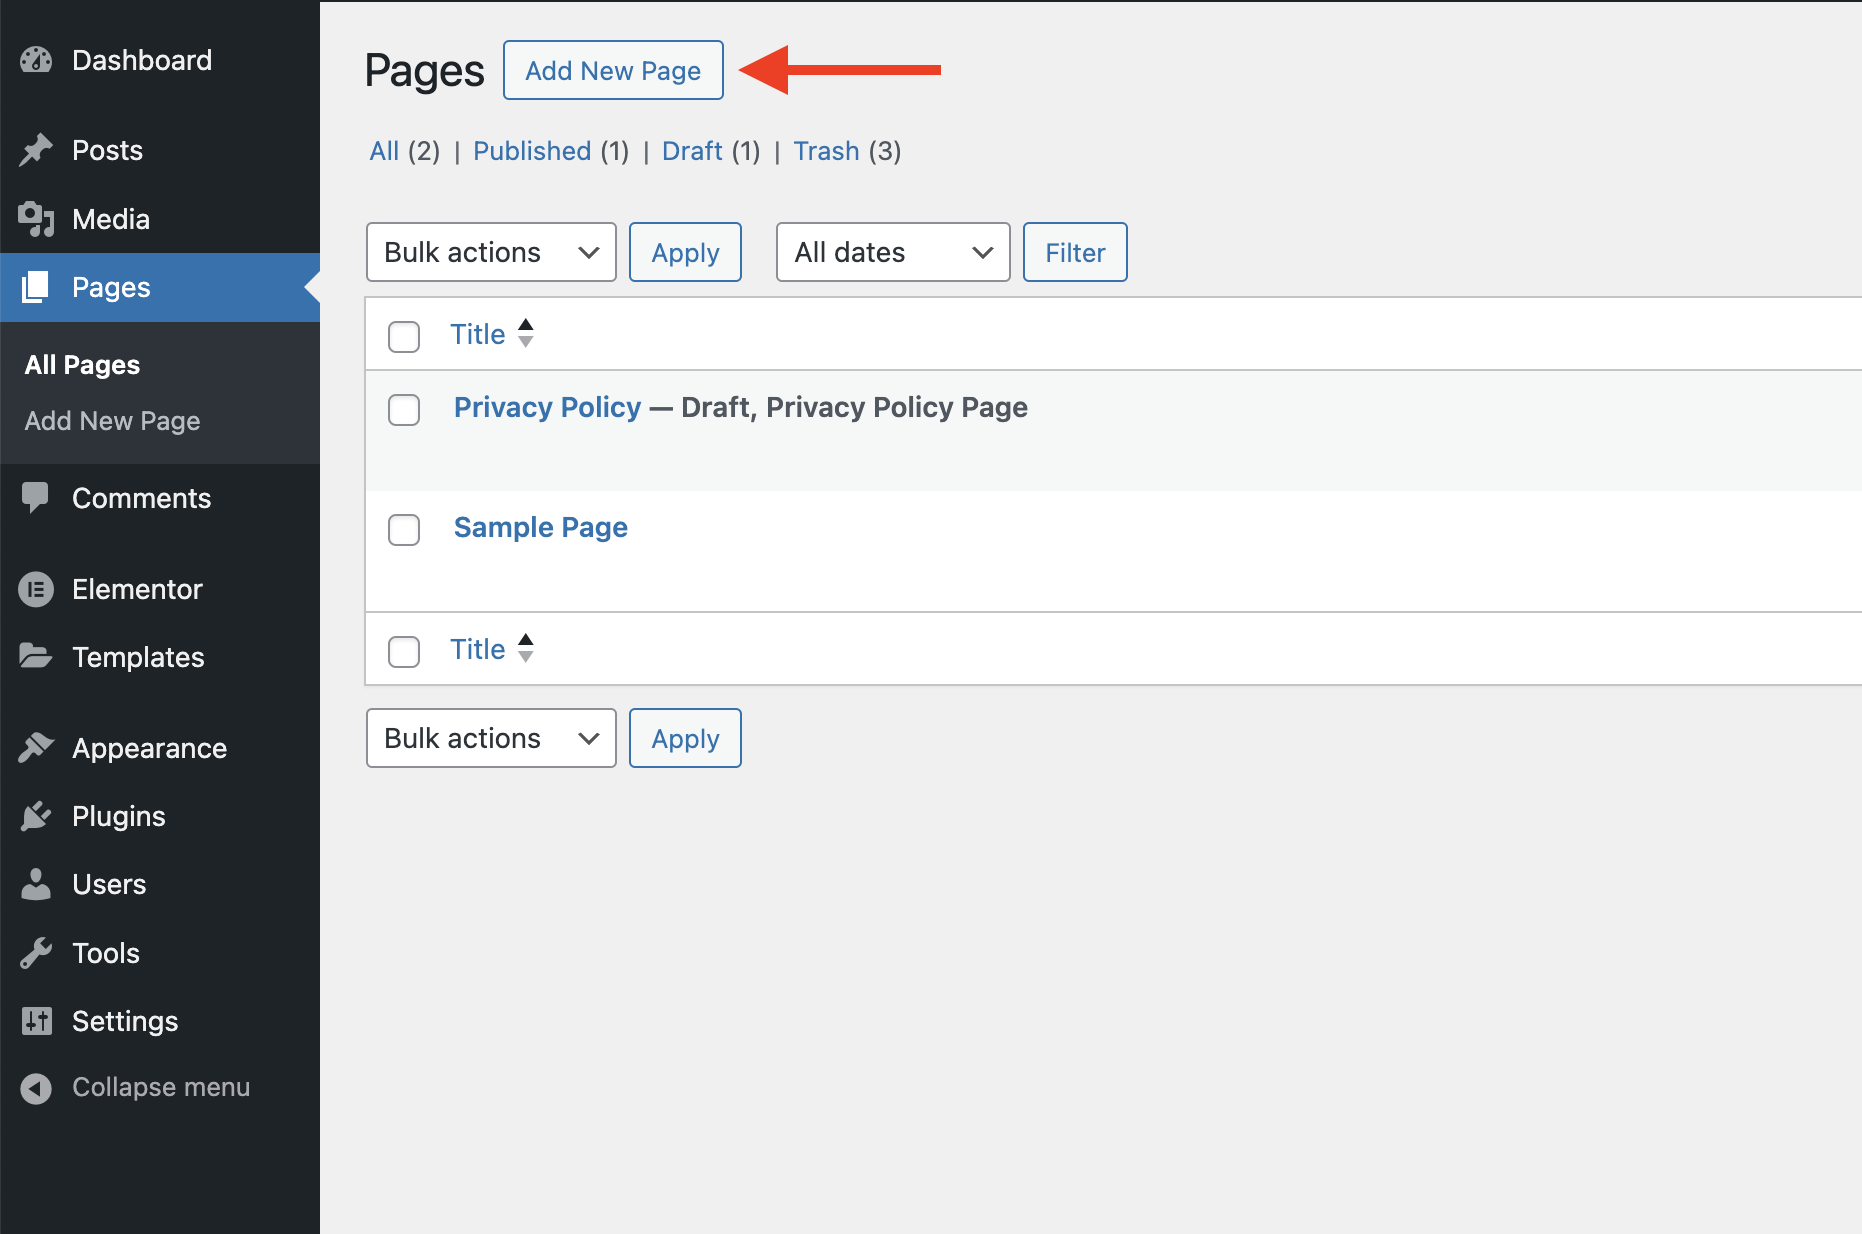
Once you hit the Add New Page button, you’ll see the Edit with Elementor button at the top.
Click it to open the page in Elementor.
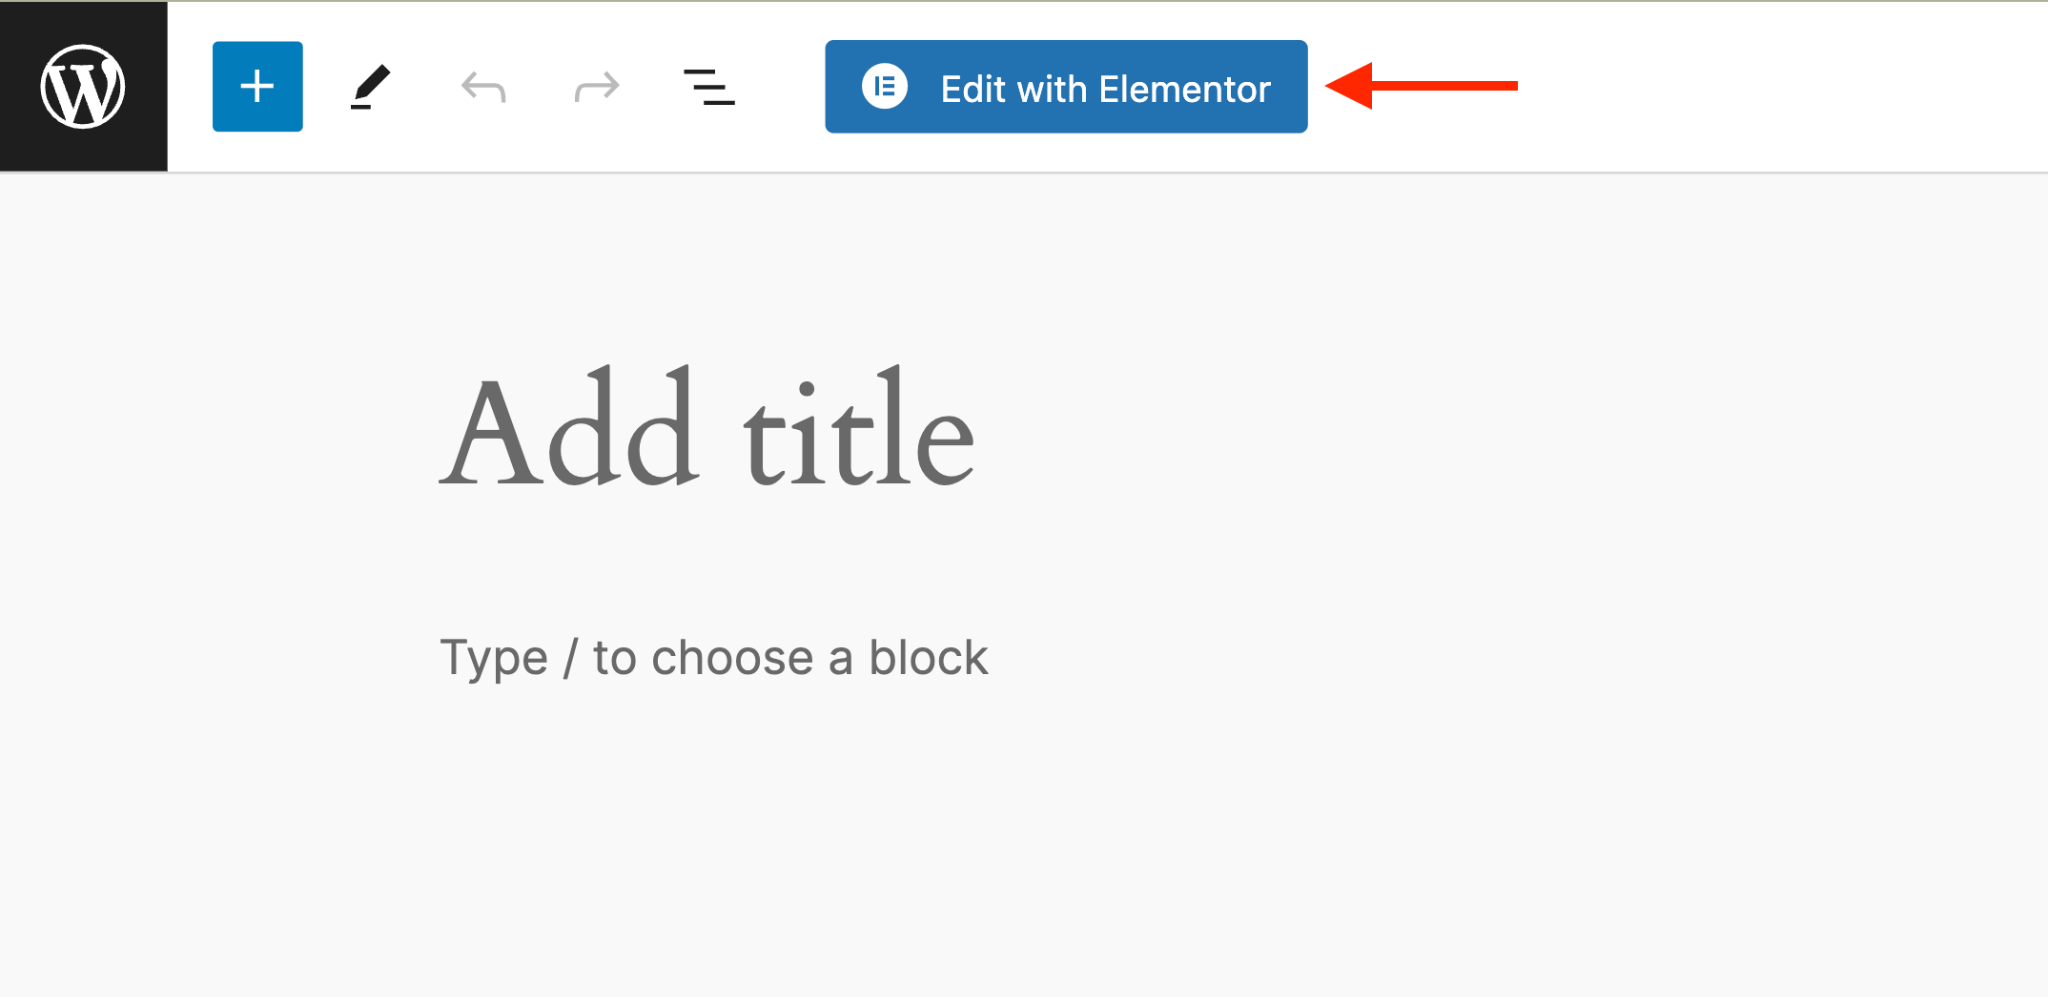
Name this page whatever you like. We named ours Parallax Effects.
To set the page name, click the gear icon in the top bar to open the settings in the left sidebar. The Title field is right at the top.
Add Reference Elements
To showcase your parallax effect, you’ll need a few elements on the page.
You can either add individual widgets or import a free wireframe from the Elementor library.

Note that the page builder offers only three wireframe designs, as most pre-made templates are part of the premium version.
We’ll go with the first wireframe.
Once you’ve added the template to your page, fill it with some images to enhance its appearance.
Click on the image placeholder to open the Image widget settings in the left sidebar.
Upload images using the Choose Image option.

After you’ve added the images, it’s time to work some magic.
Add a Container for the Parallax Effects
Add a new container anywhere on the page. We’ll place it before the second container.
To do this, hover over the second container until its border and the “+” sign appear.
Click the “+” sign to add an Elementor panel before it.
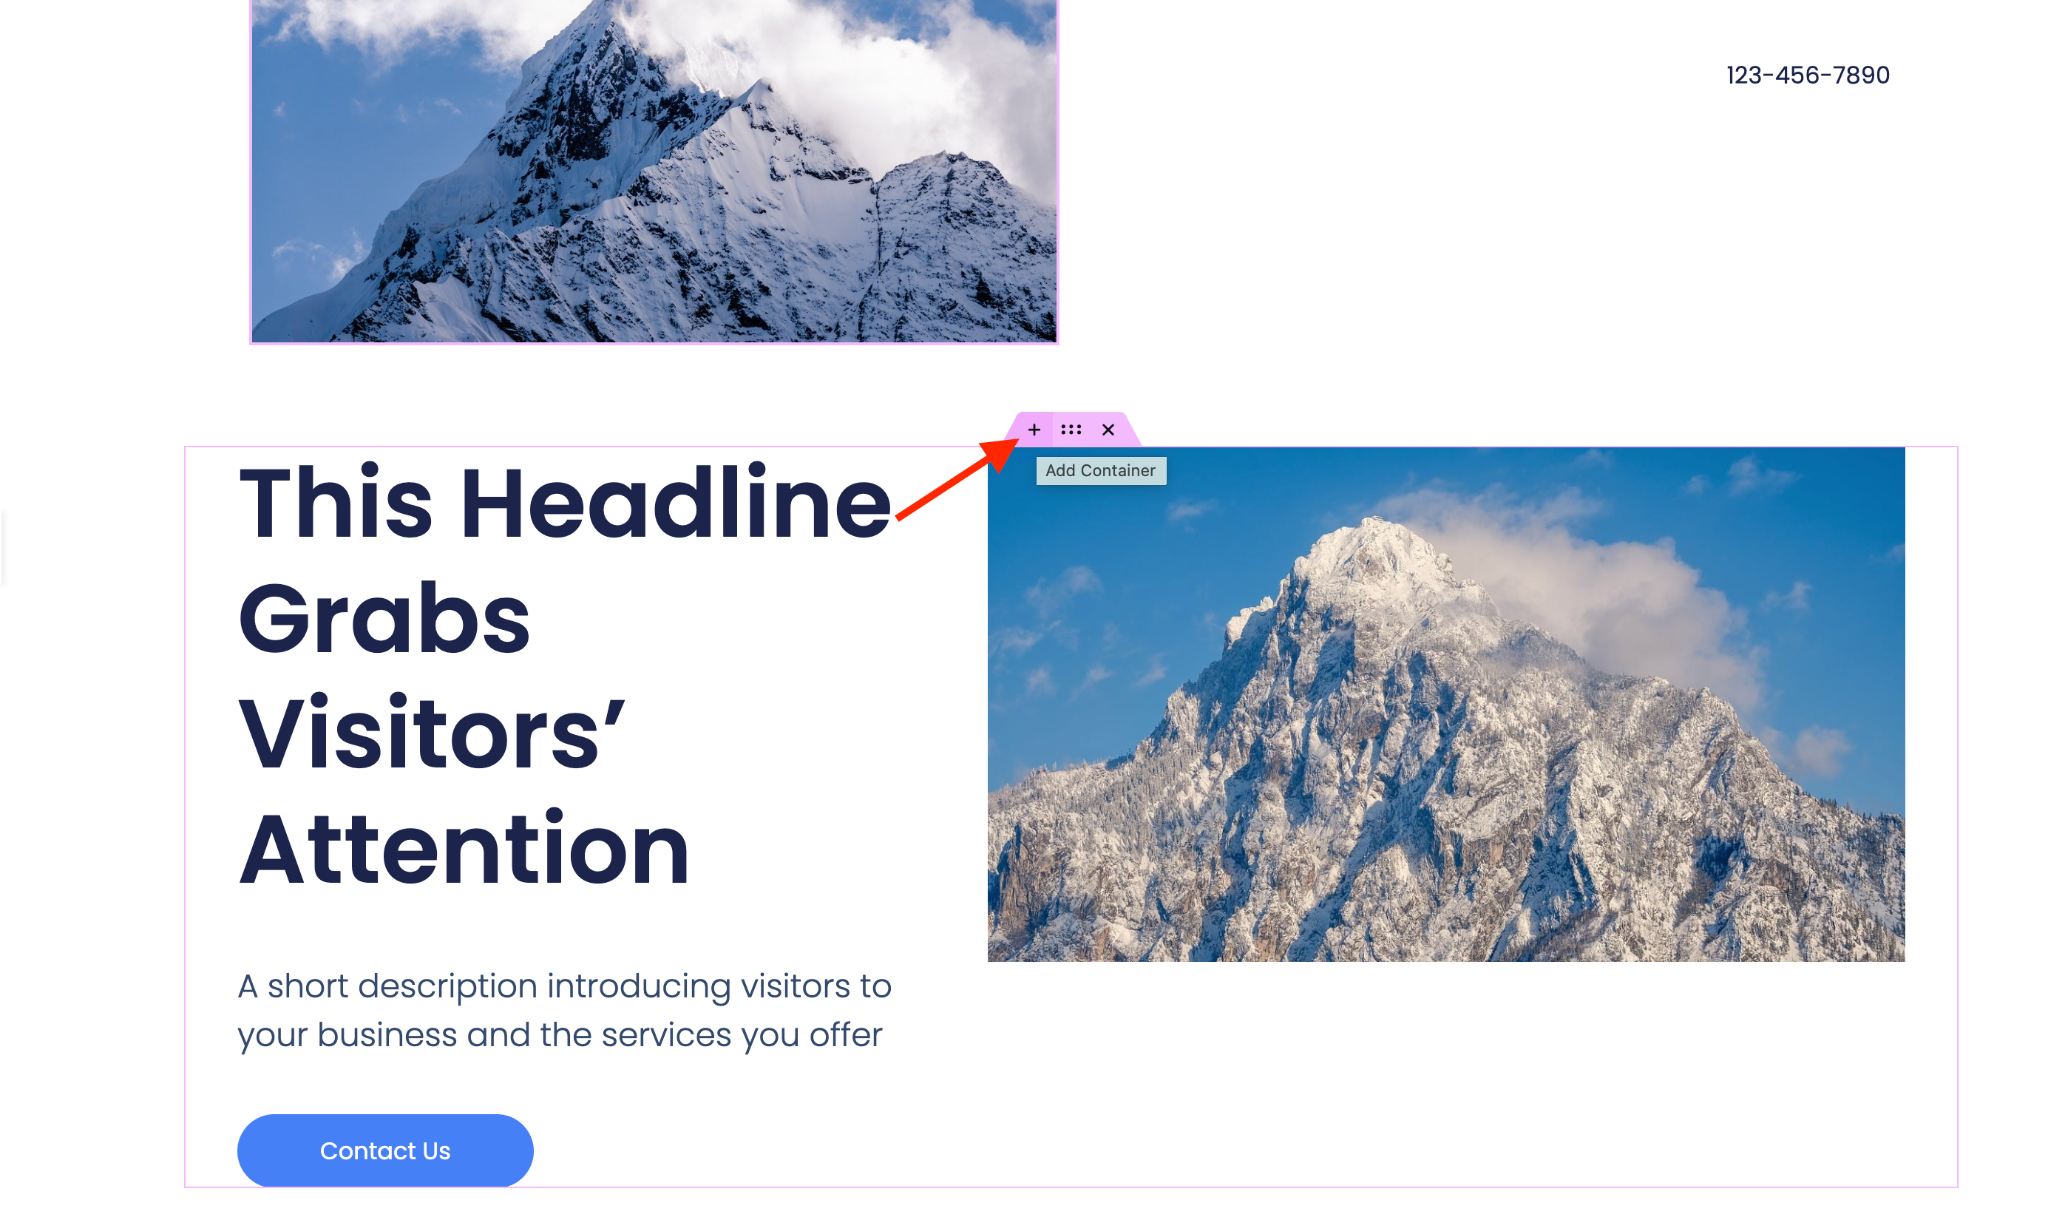
You’ll see a “+” sign, a folder icon, and an AI button. Click the “+” sign to add a Flexbox container.
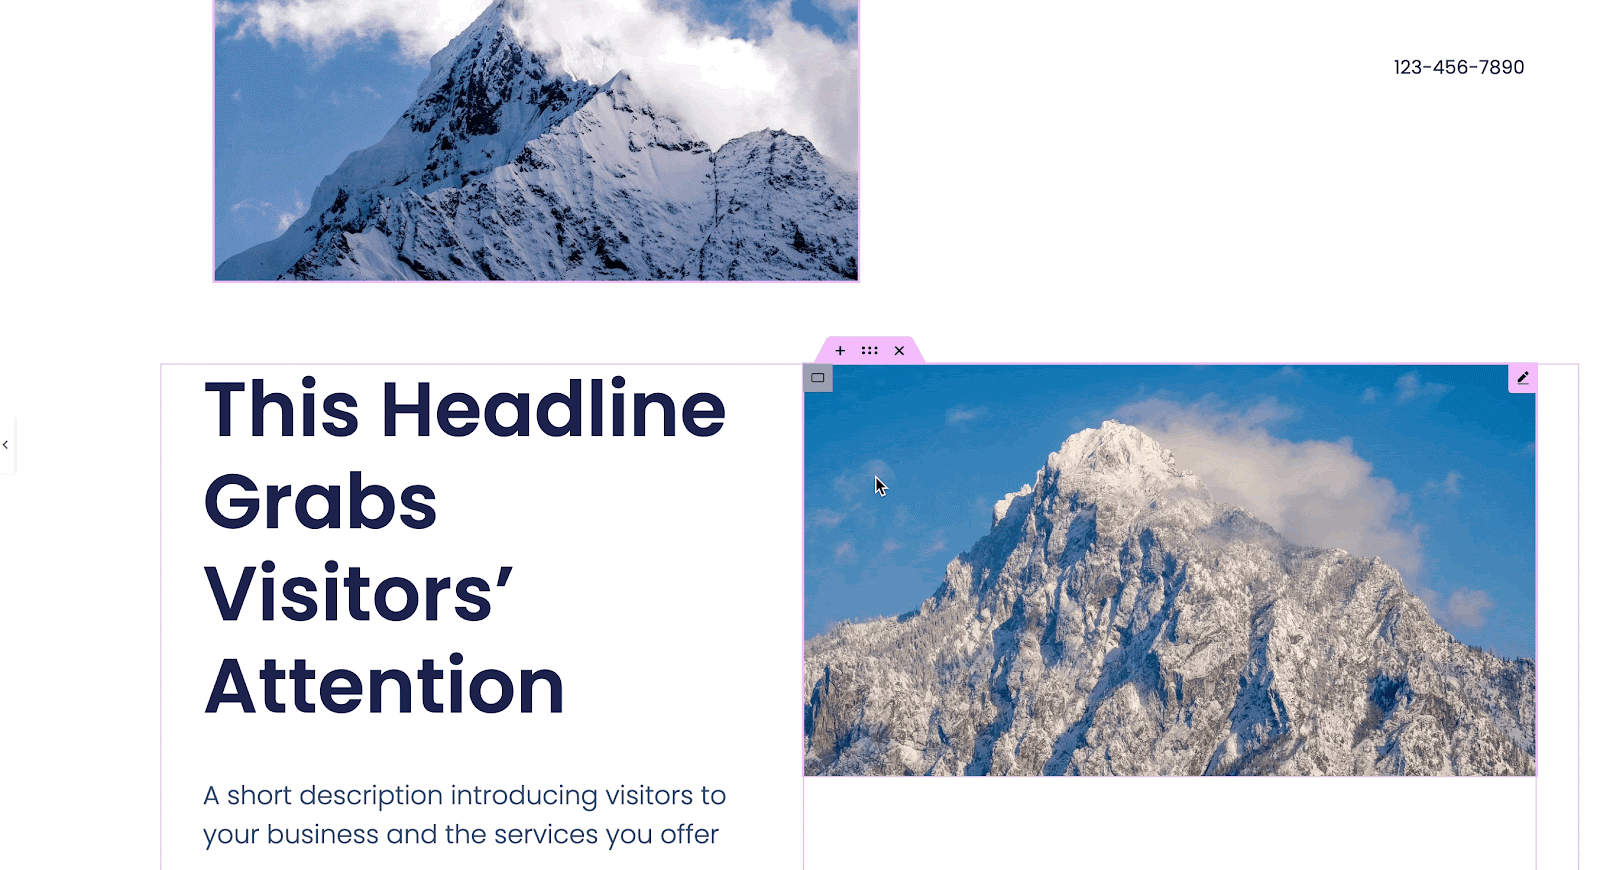
Next, we’ll set a background image for this container and tweak some settings in the sidebar.
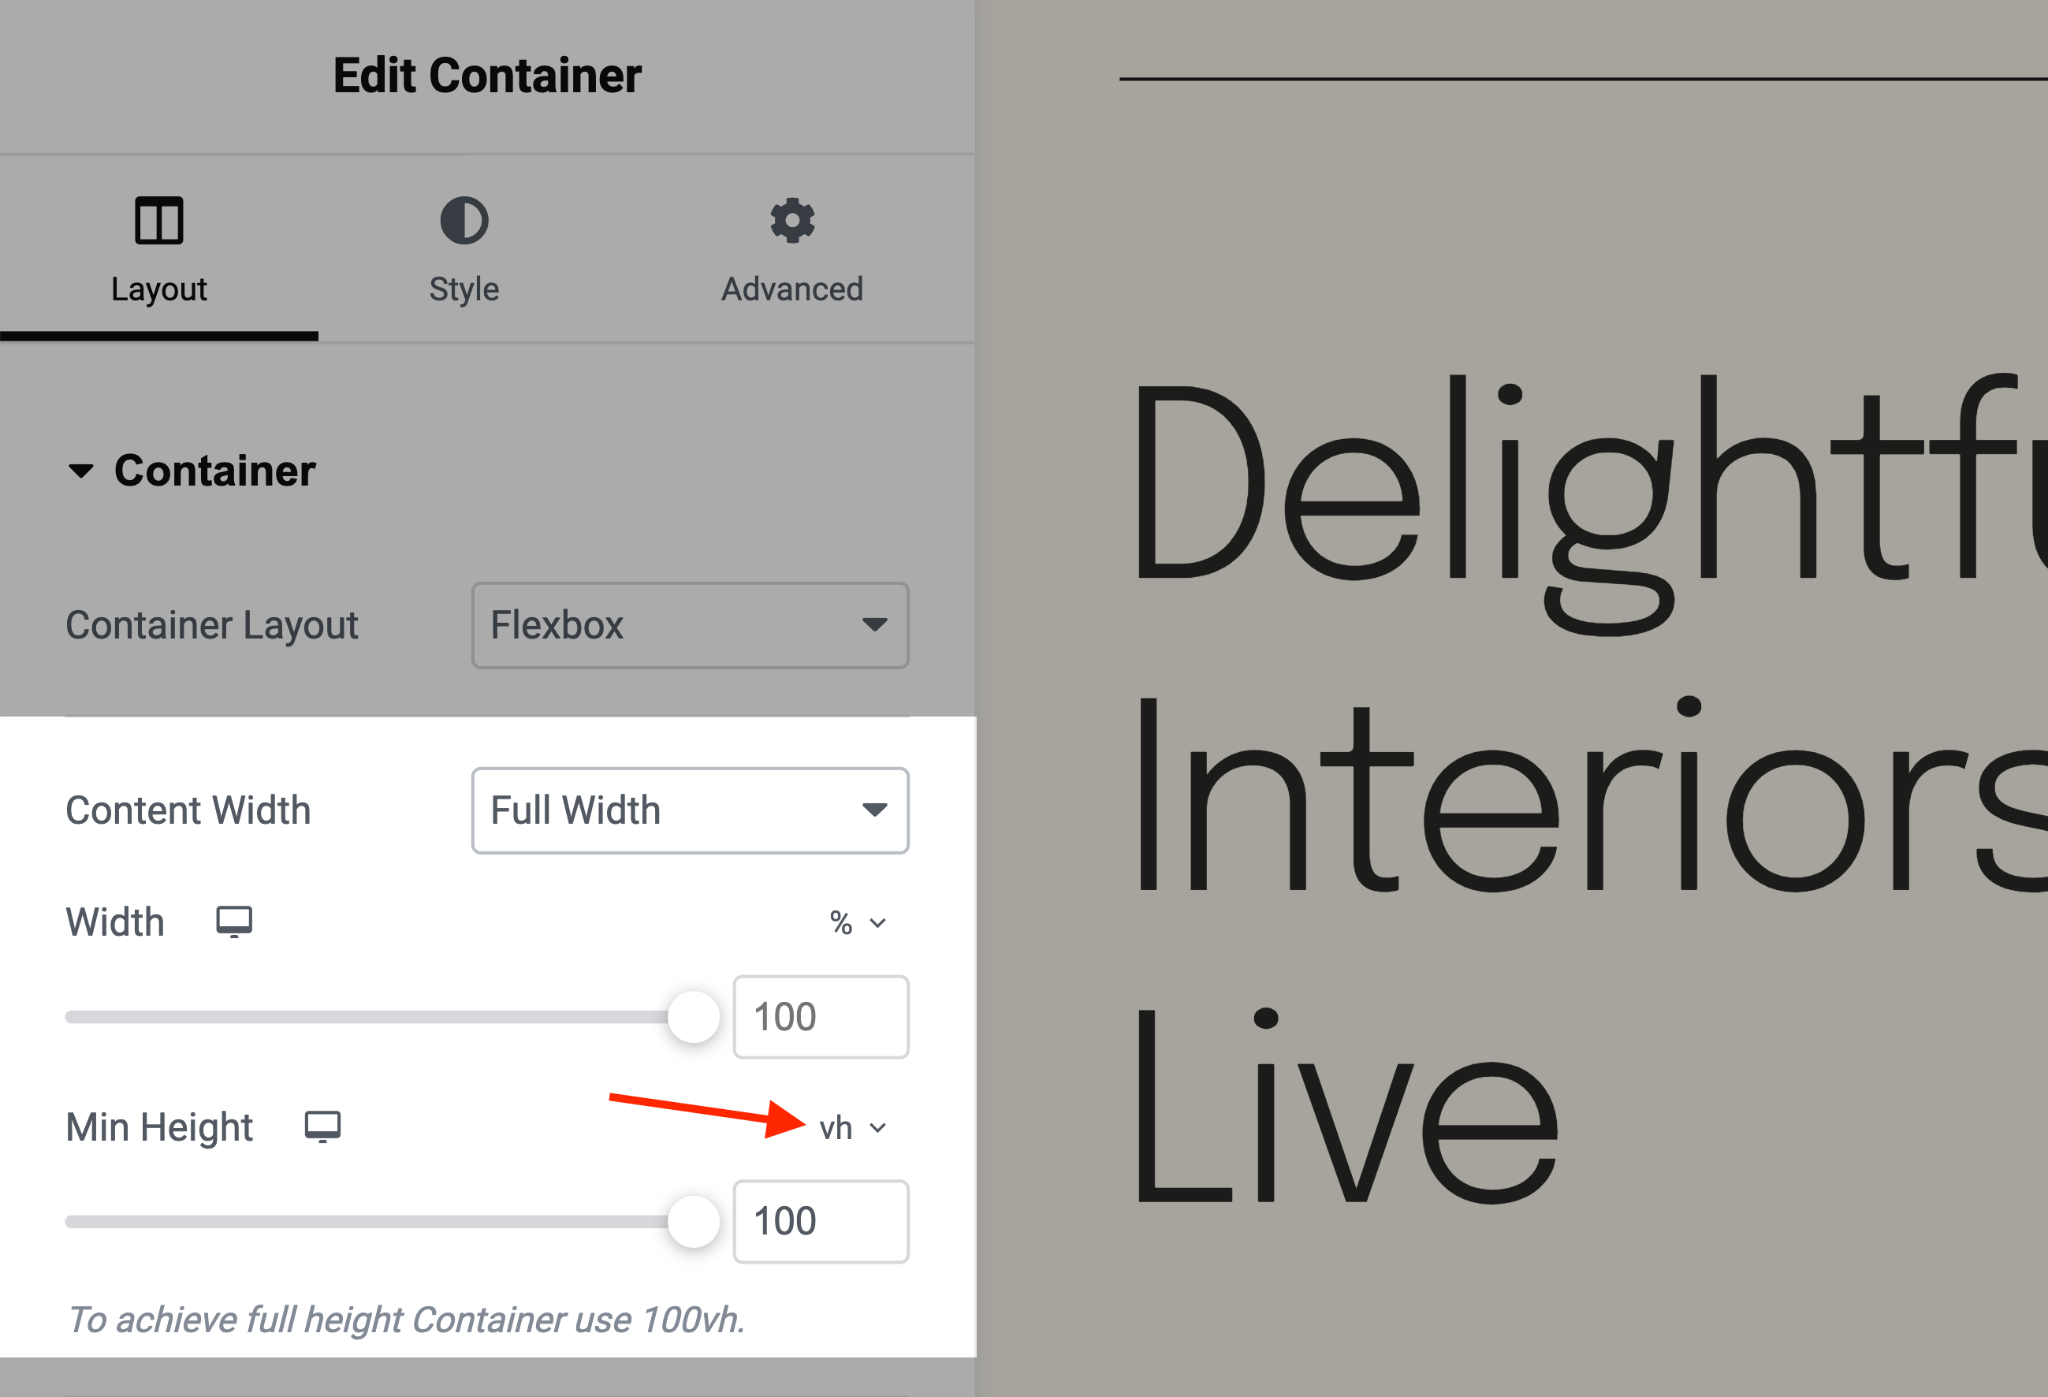
Click on the edit container button at the top to open its settings in the left sidebar. You’ll see three tabs: Layout, Style, and Advanced.
In the Layout tab, scroll down to Min Height and set the value according to your needs. We used 800px for this example.
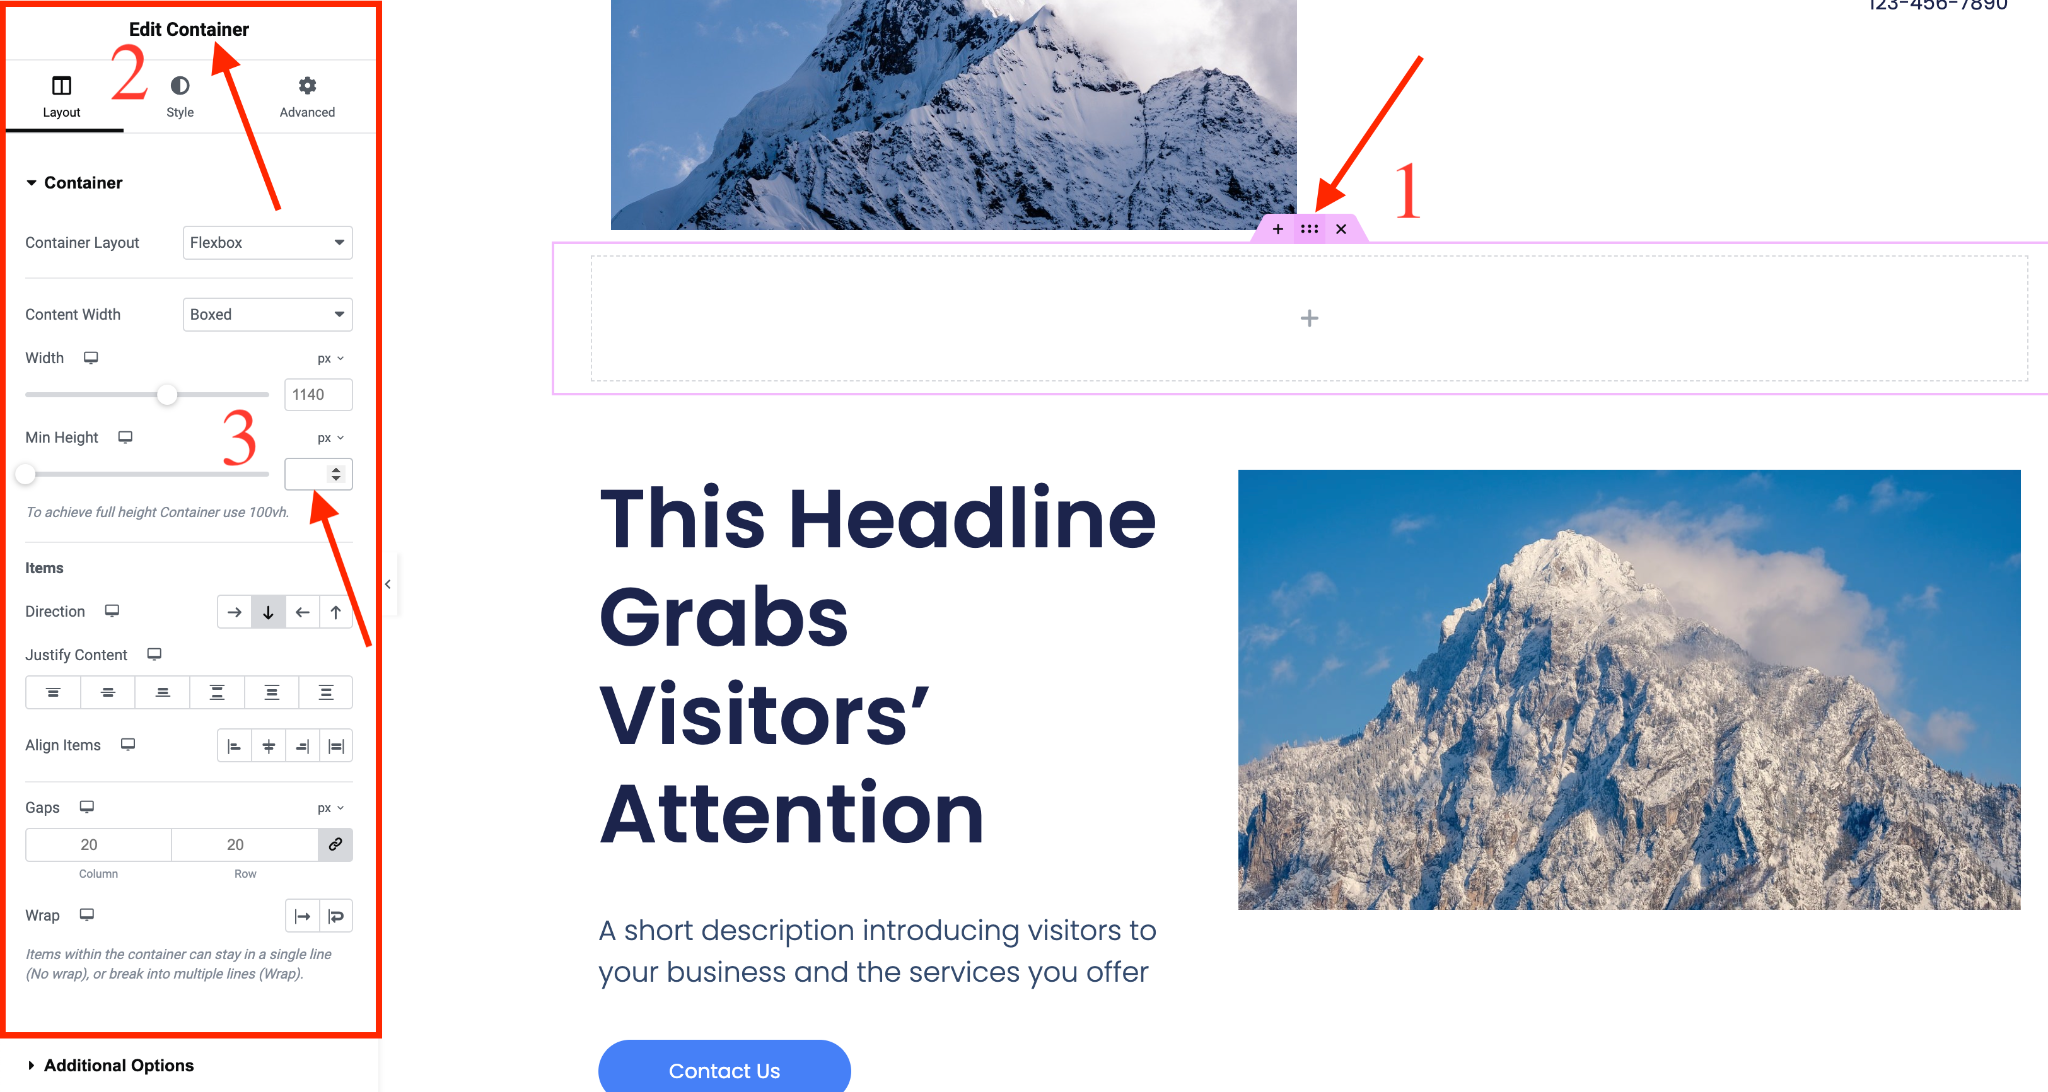
Now, switch to the Style tab and scroll down to the image section.
Choose an image to display as a fixed background for the parallax effect.
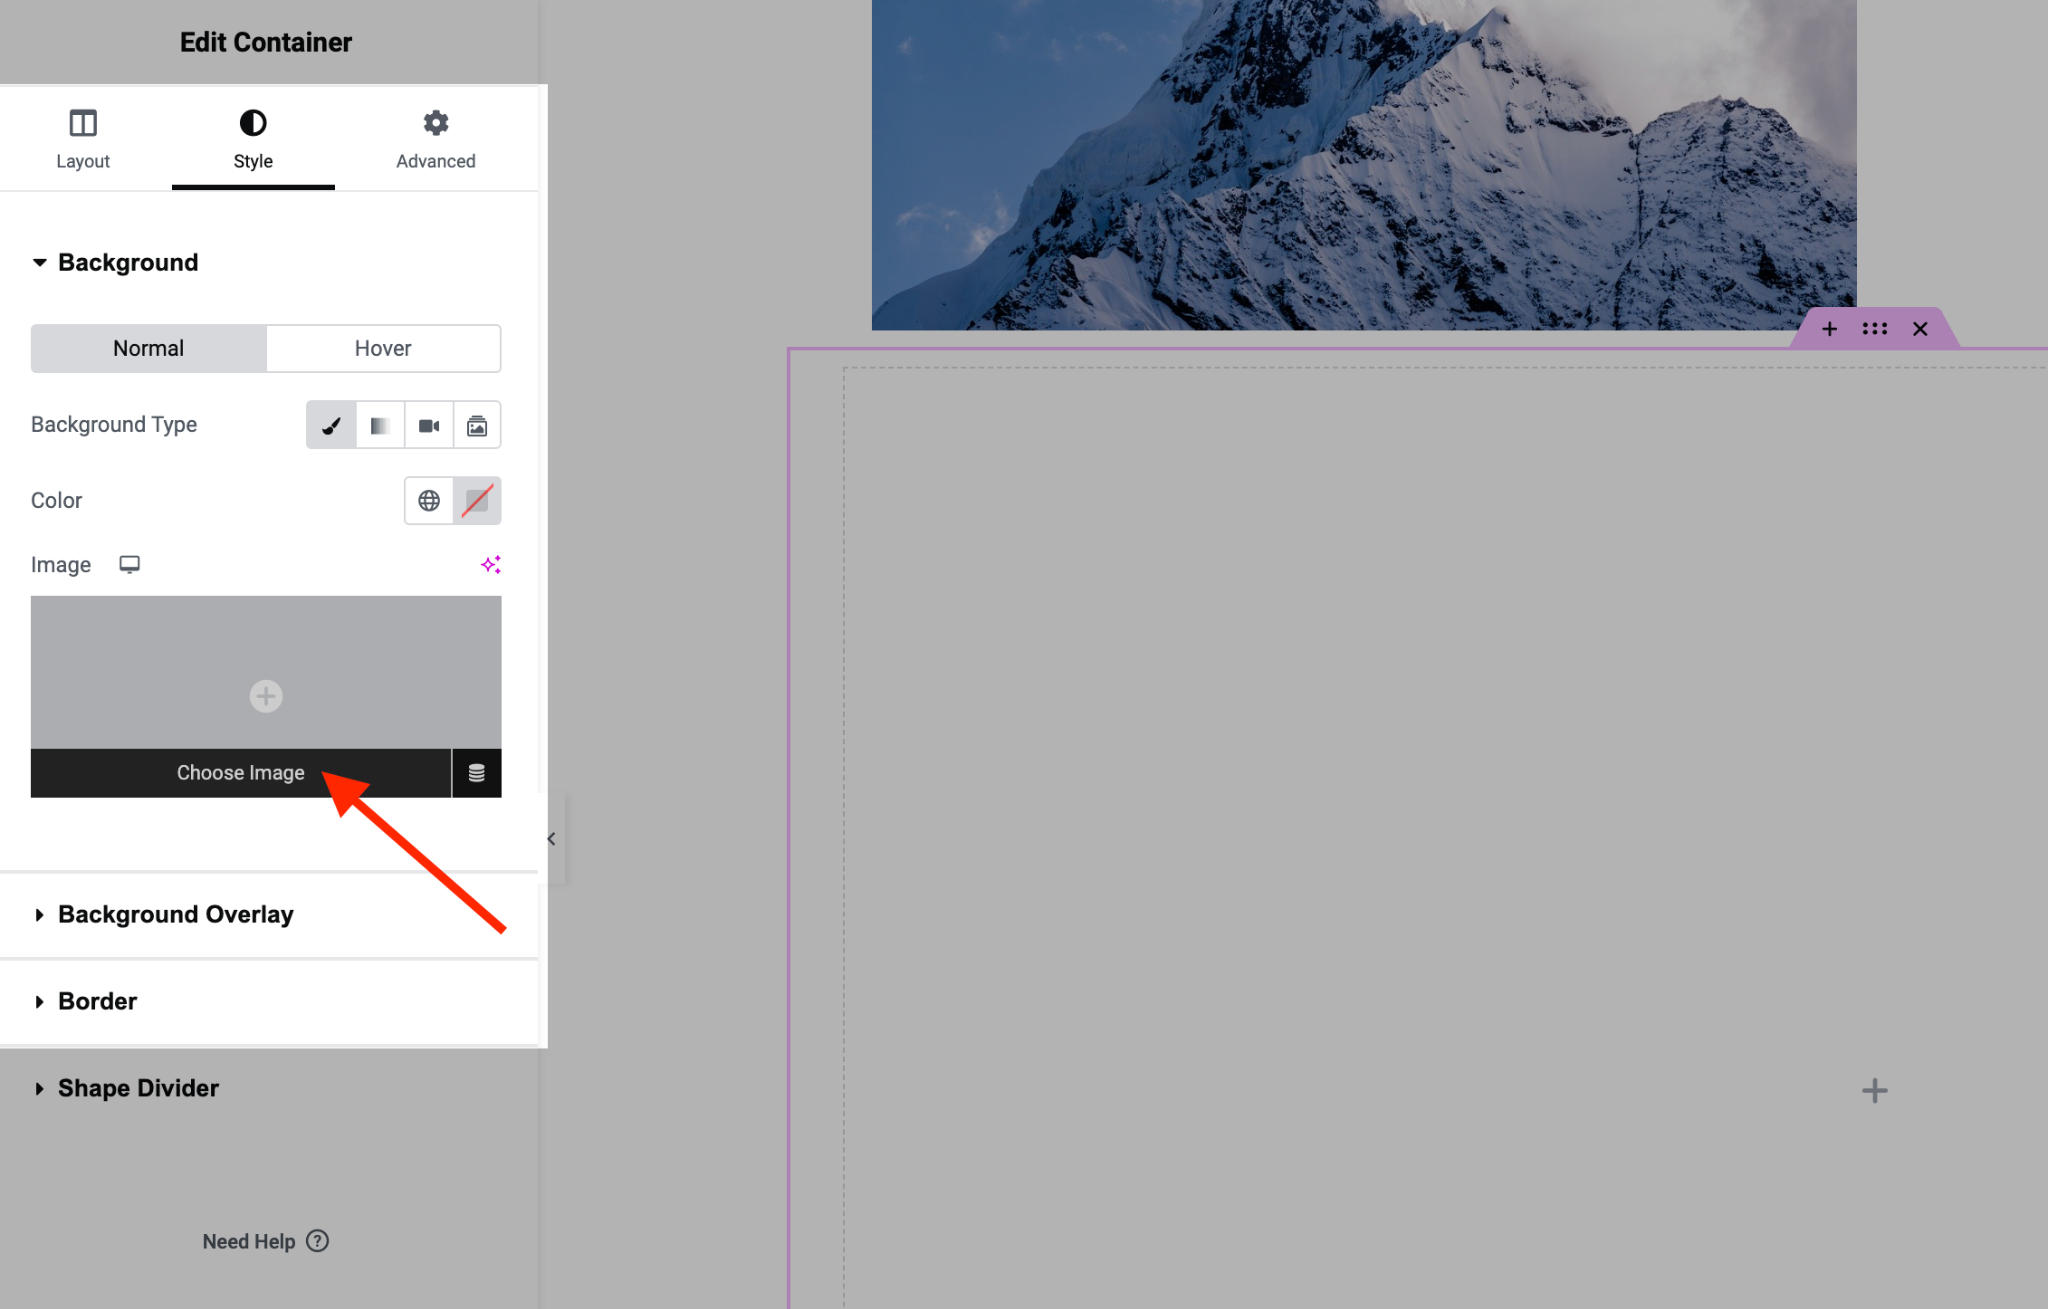
- Once the image is selected, set the following values:
- Position: Center Center
- Attachment: Fixed
- Display Size: Cover
Drag a Heading widget into the parallax container and add your desired text.
In the Advanced tab, set the Position value to Fixed and place the widget where you want it on the image.
You can also choose Inline (auto) for the width.
Finally, hit the Publish button to make your page live and see how it looks.

Creating Parallax Effects with Elementor Pro
You can get more creative and versatile with your parallax effects with Elementor Pro.
It includes all the tools you need in the Advanced tab of each widget or container.
The premium version offers new motion and mouse effects, giving you the flexibility to treat each element on your page uniquely.
For instance, you can:
- Reveal headings from behind an image.
- Make elements that start visible gradually hide behind others.
- Move elements horizontally across the page.
Let’s dive into some key motion effects that make Elementor Pro a game-changer for creating remarkable parallax effects.
Key Motion Effects
You can discover many more effects with Elementor Pro, but these key motion effects are the ones most often used for all the parallax magic.
- Blur: This effect lets you blur specific elements and create a soft focus that changes as you scroll. It’s perfect for drawing attention to key areas of your content.
- Scroll: This gives you control over how elements move as you scroll down the page. You can create vertical or horizontal parallax, rotate elements, or even scale them up or down.
- Mouse: This effect allows elements to respond to cursor movements, adding an interactive layer. You can set elements to move in different directions or rotate slightly as the user moves the mouse.
- Transparency: This lets you apply a fade effect using the transparency motion setting. You can decide if you want the element to fade in, fade out, fade out and then in, or fade in and then out.
Create a Blur Parallax Effect
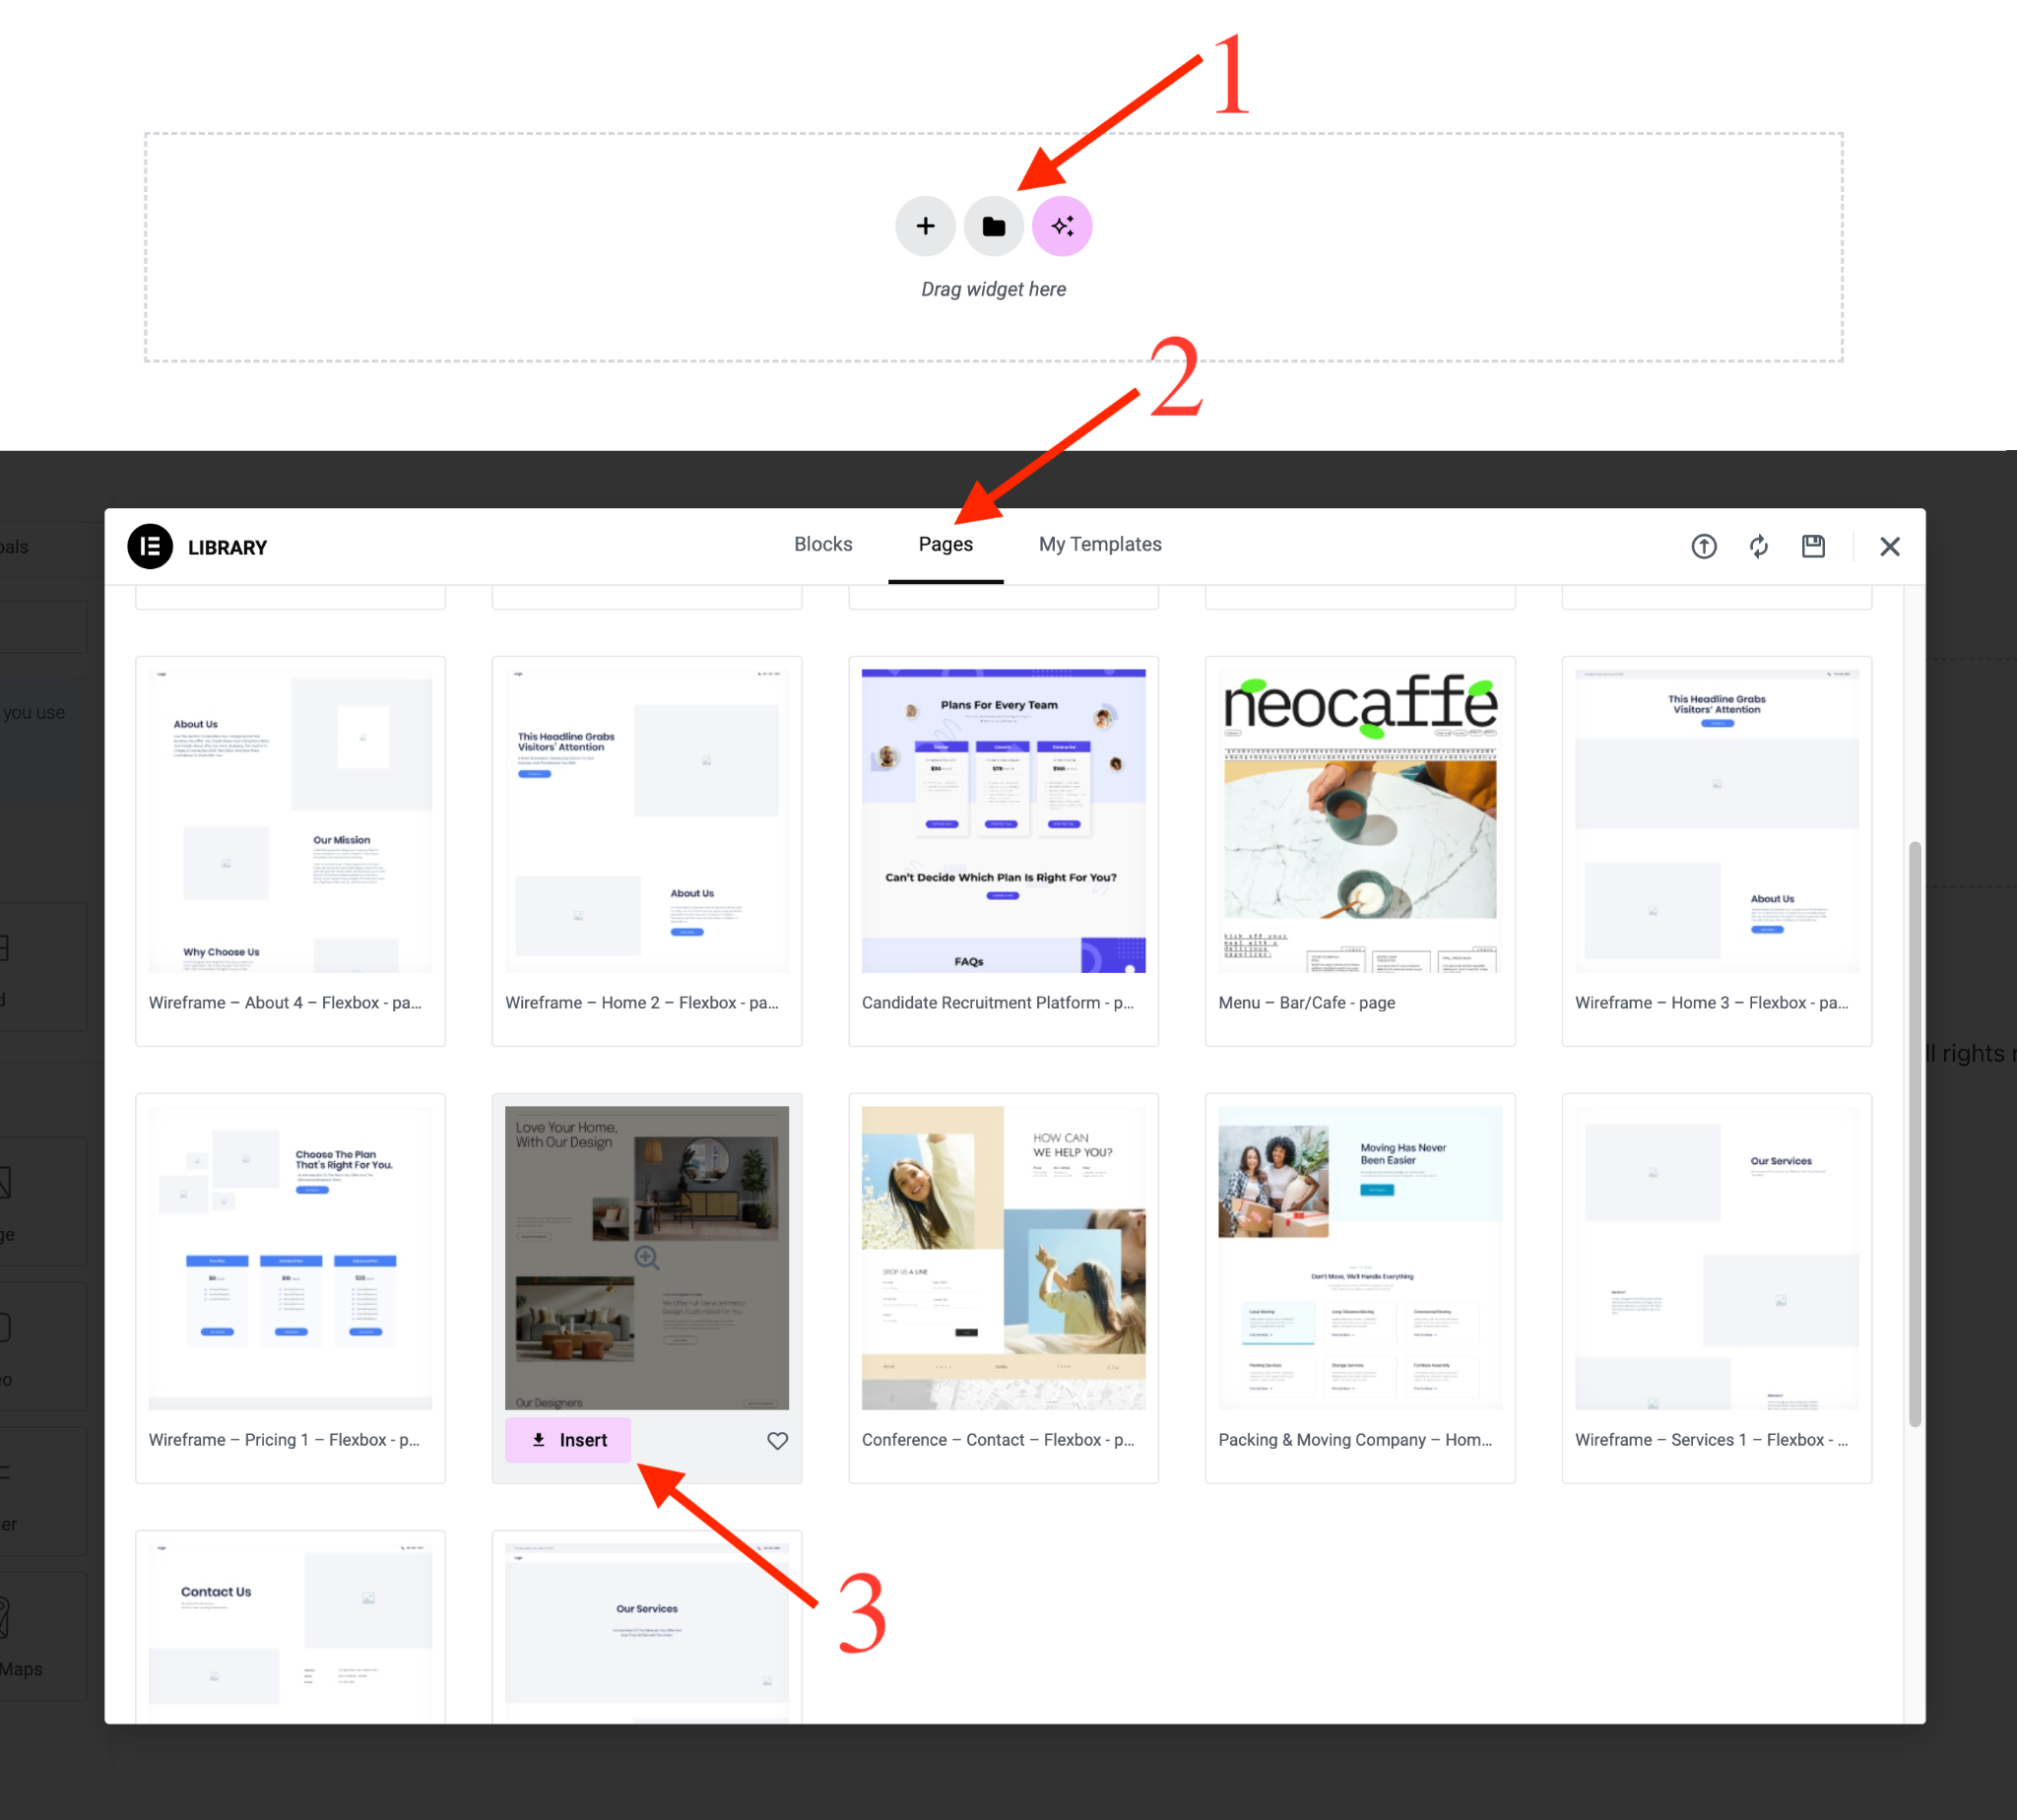
To create a blur parallax effect, we’ll start by importing a premade page template from Elementor’s library.
We’re using a template to save time but you can also create something from scratch.
In the Elementor editor, click the Add Template icon to open the templates library.
Go to the Pages tab and import the Furniture template.
Next, we’ll repeat a few steps from the previous section:
- Add a container after the first one.
- Add a flexbox within it.
- Set the view height to 100 in the Layout tab
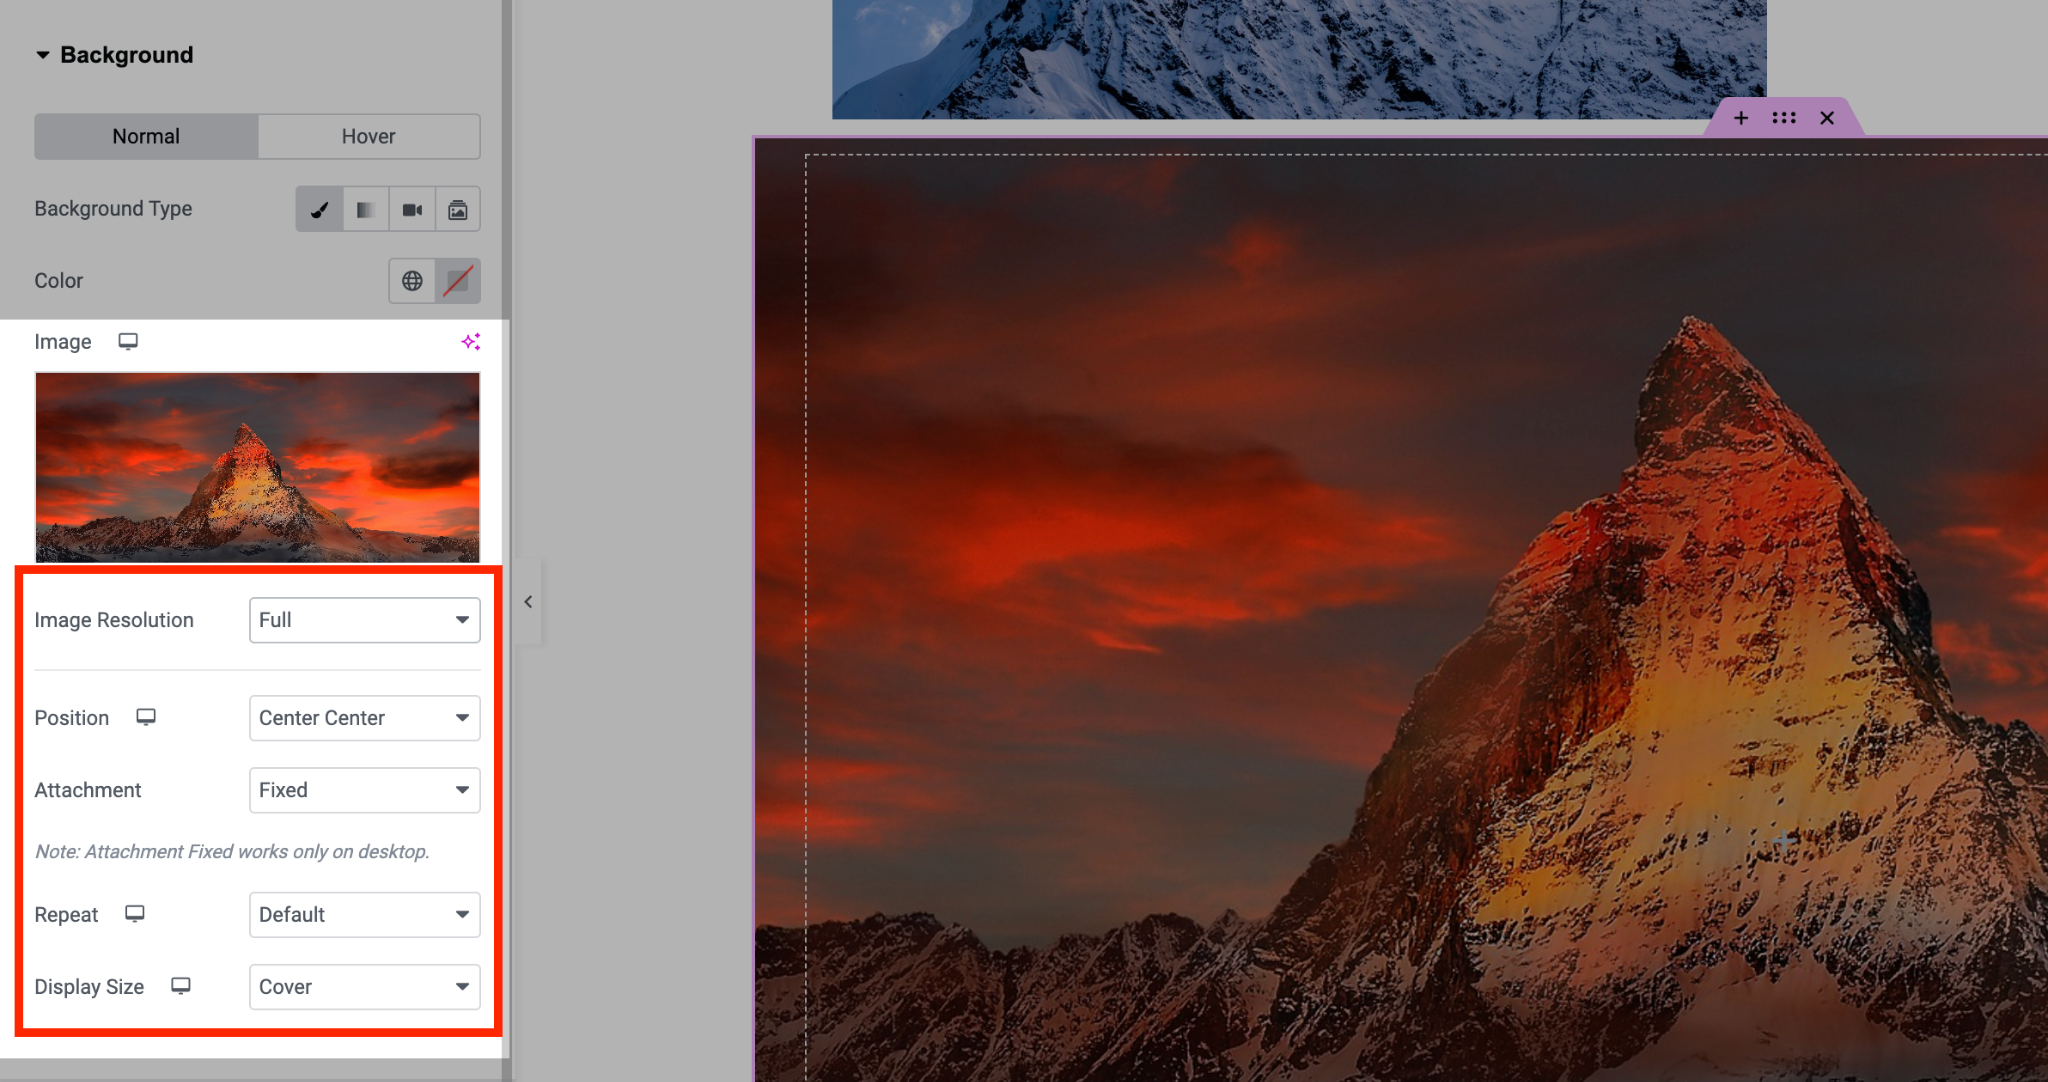
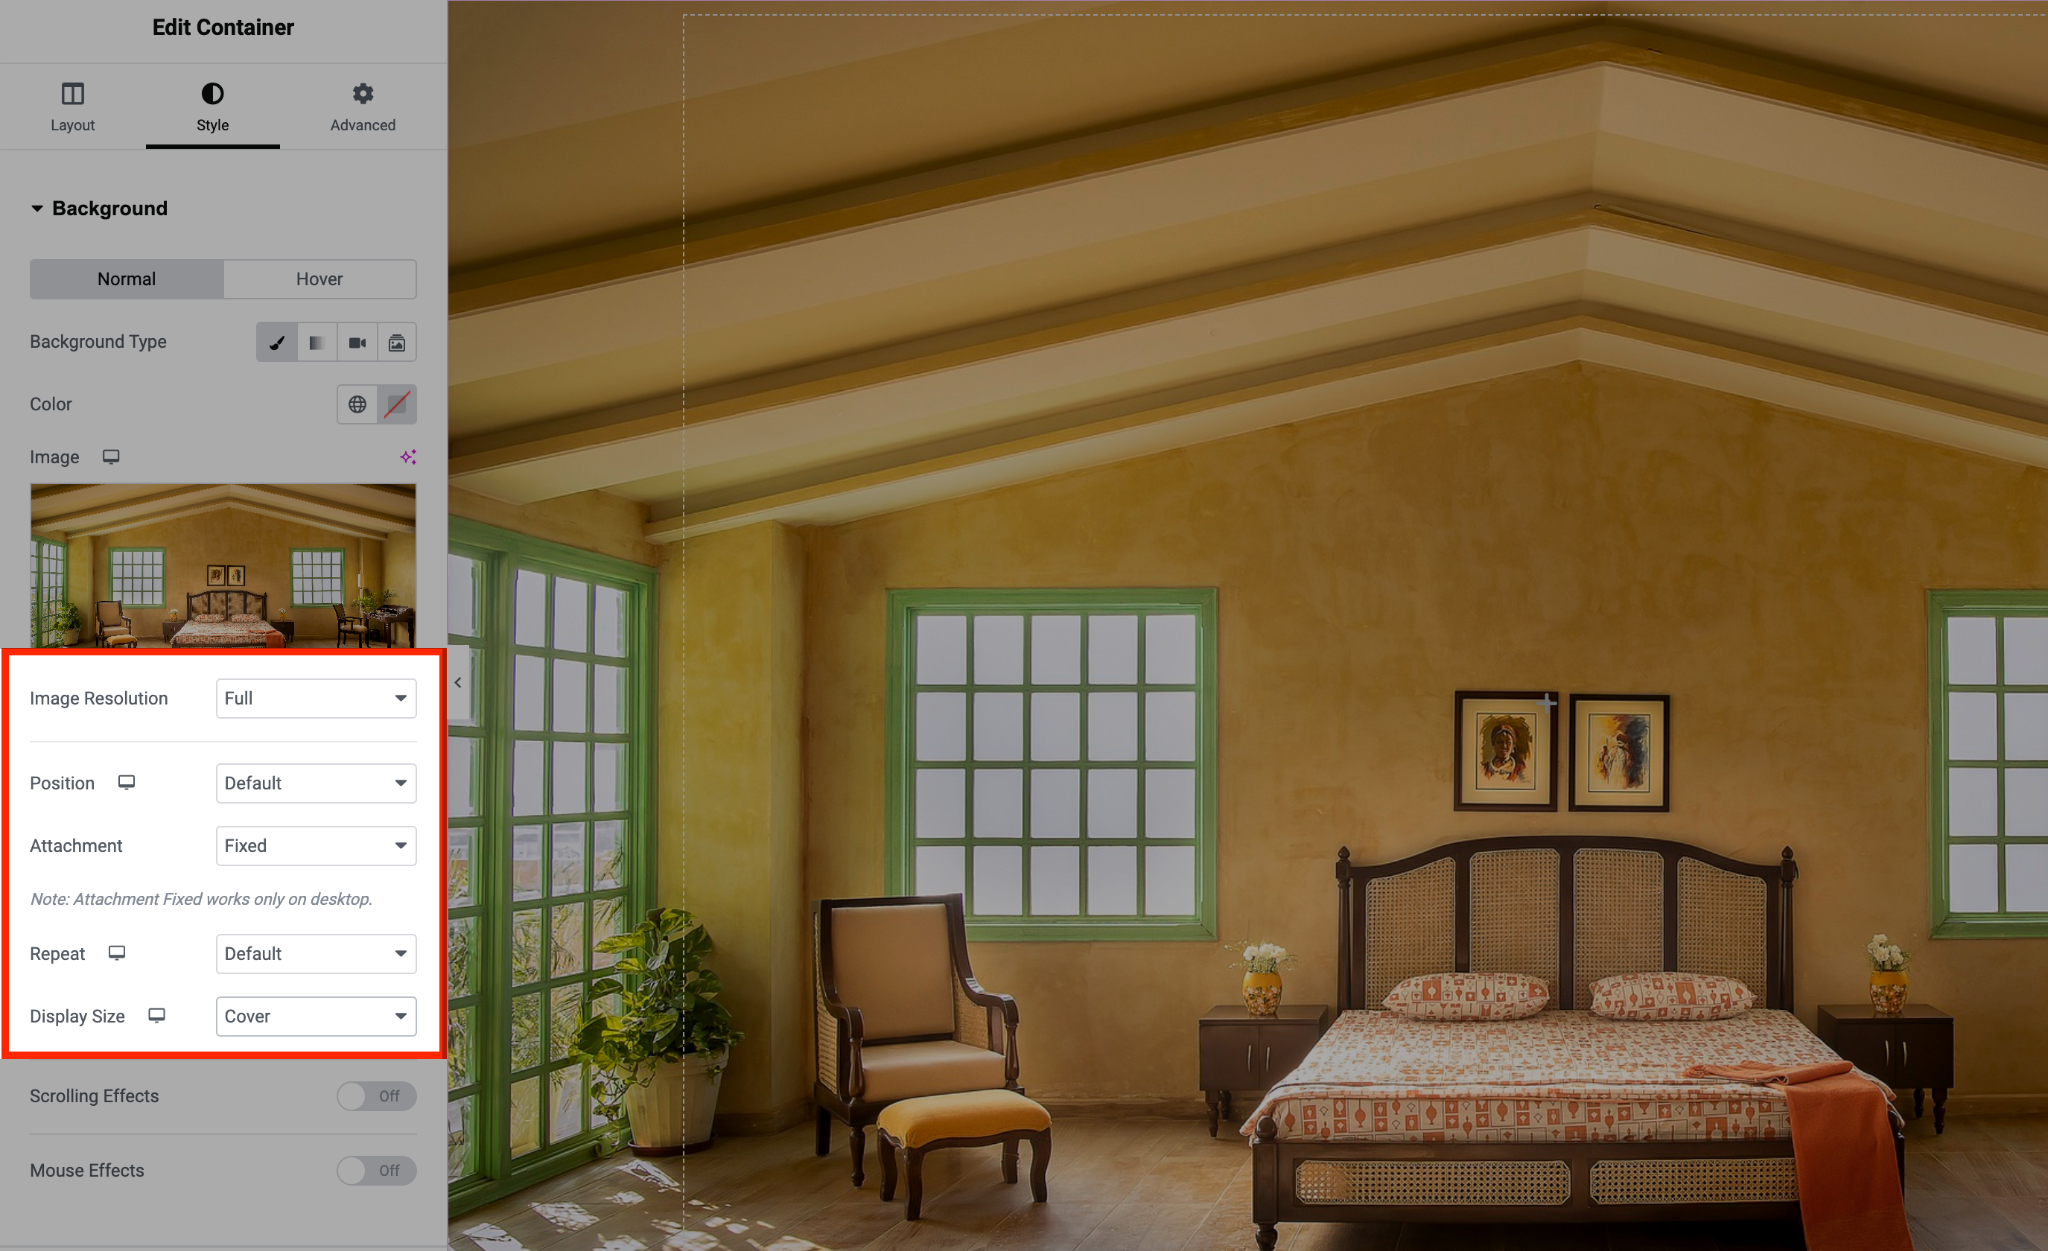
- In the Style tab, choose a background image for this container.
- Set Image Resolution to Full, Attachment to Fixed, and Display Size to Cover.
If you need help adding containers with Elementor, check out this tutorial.
Now, head to the Advanced tab, scroll down to the Motion Effects section, and enable the Scrolling Effects toggle to reveal multiple controls.
Under Blur effect, click the pencil icon and adjust the Direction, Level, and Viewport settings as needed.
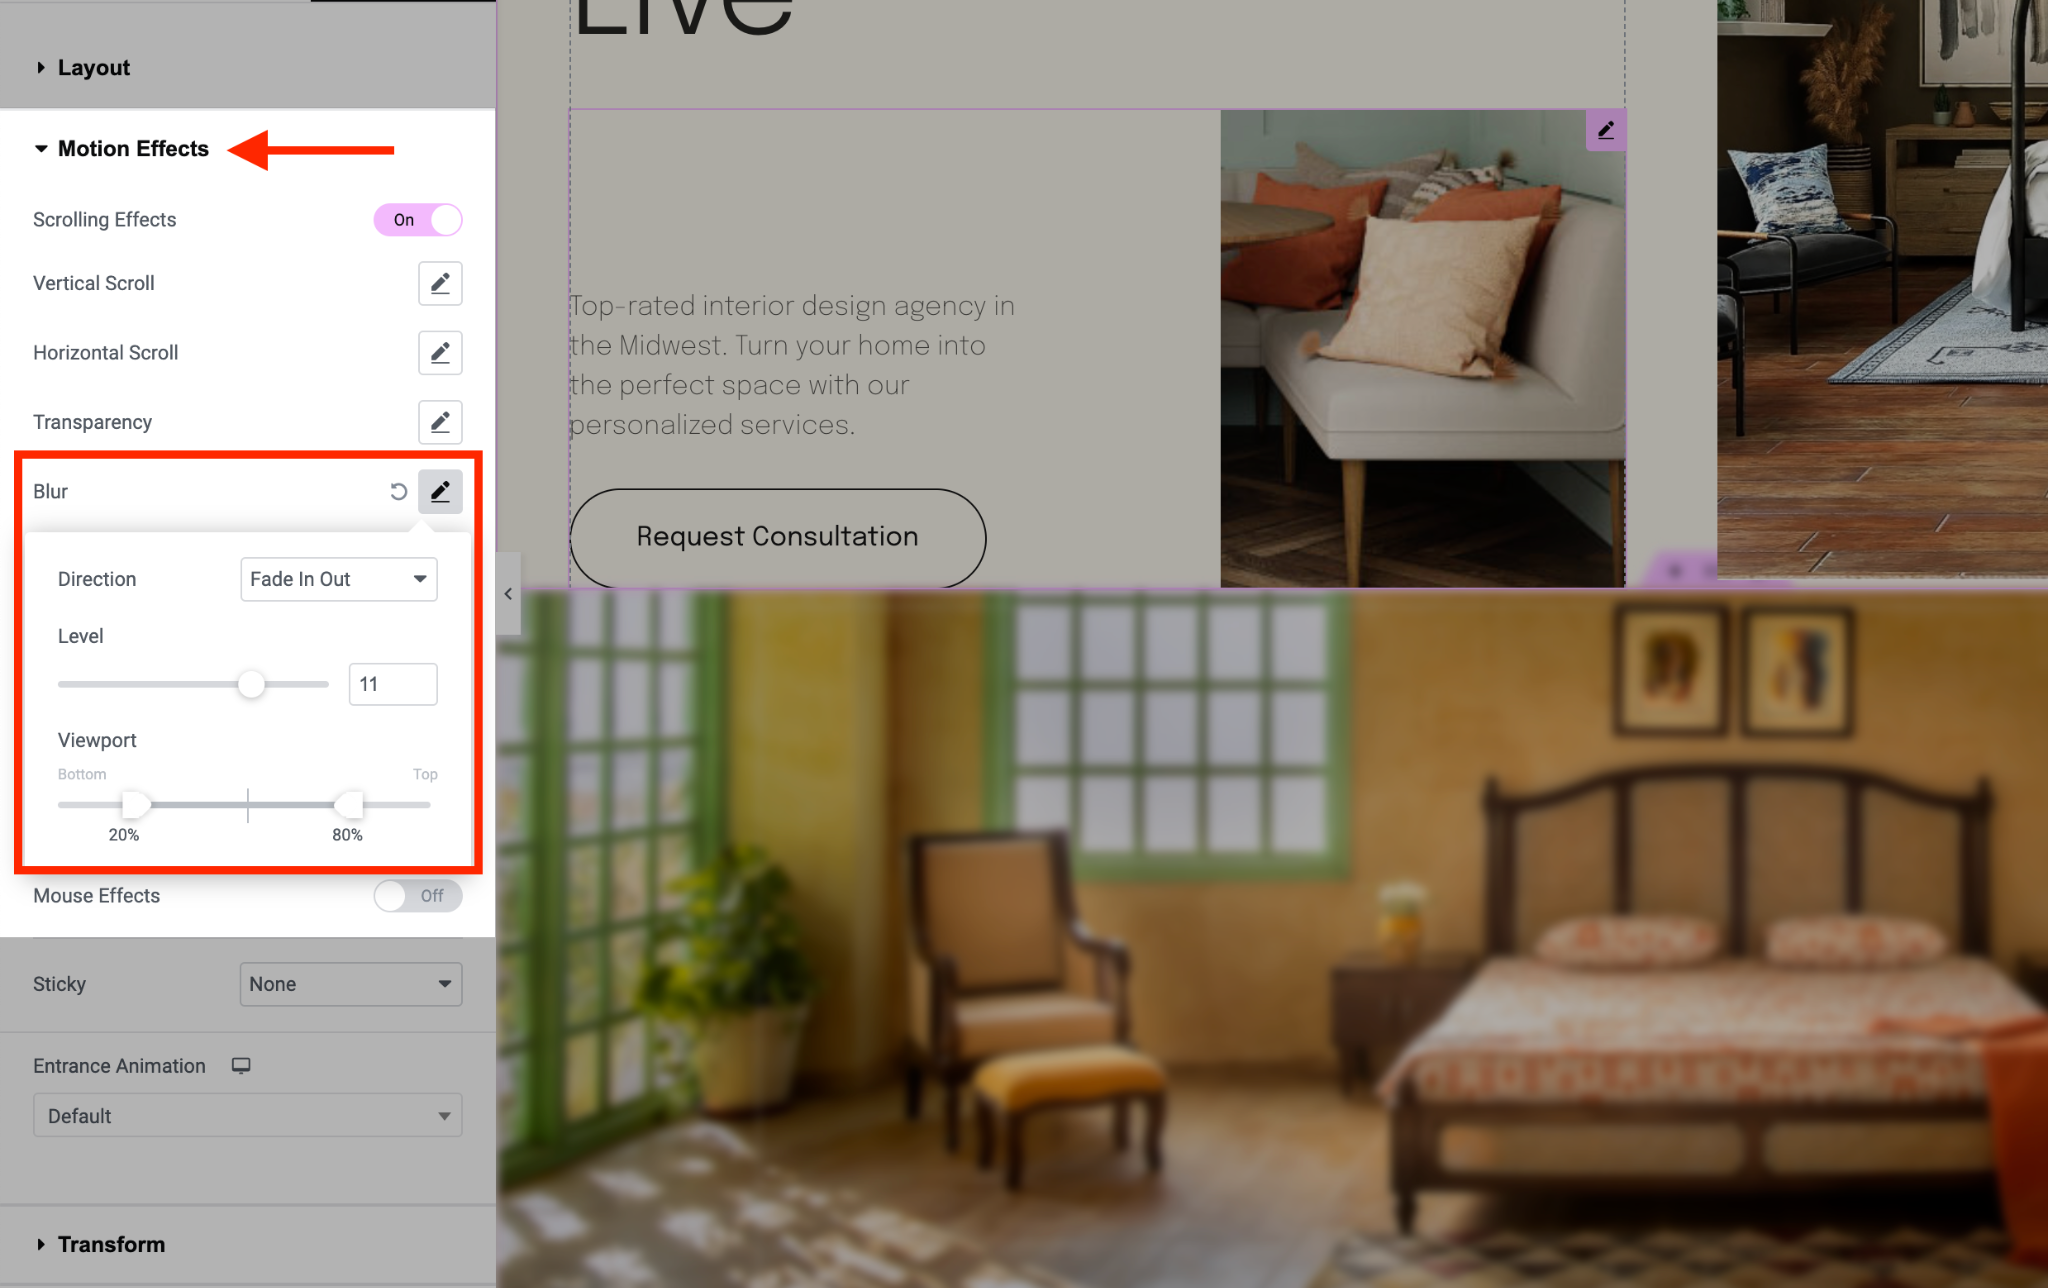
Once you’re happy with the changes, hit Publish.
Scroll up and down to see how the blur parallax effect works on your site.

Create Scroll and Motion Parallax Effects
In this step, we’ll walk you through adding various movements to objects as you scroll or move your mouse.
To get started, add a container to your page. For this example, we used a flex container.
In the Layout tab, set the container’s Min Height to 100vh.
Next, go to the Advanced tab, enable Scrolling Effects under Motion Effects, and adjust the values for the Vertical Scroll extension.
You can leave the rest of the settings at their default values.
Now, drag and drop the Text widget from the left sidebar into the container.
Type in your desired text, then enable Scrolling Effects for this widget.
Apply the Scale effect to increase the text size as you scroll.
We also added a few Image widgets to our container. Since our sample page is about furniture, we used images of chairs.
Feel free to use images that match your page’s theme.
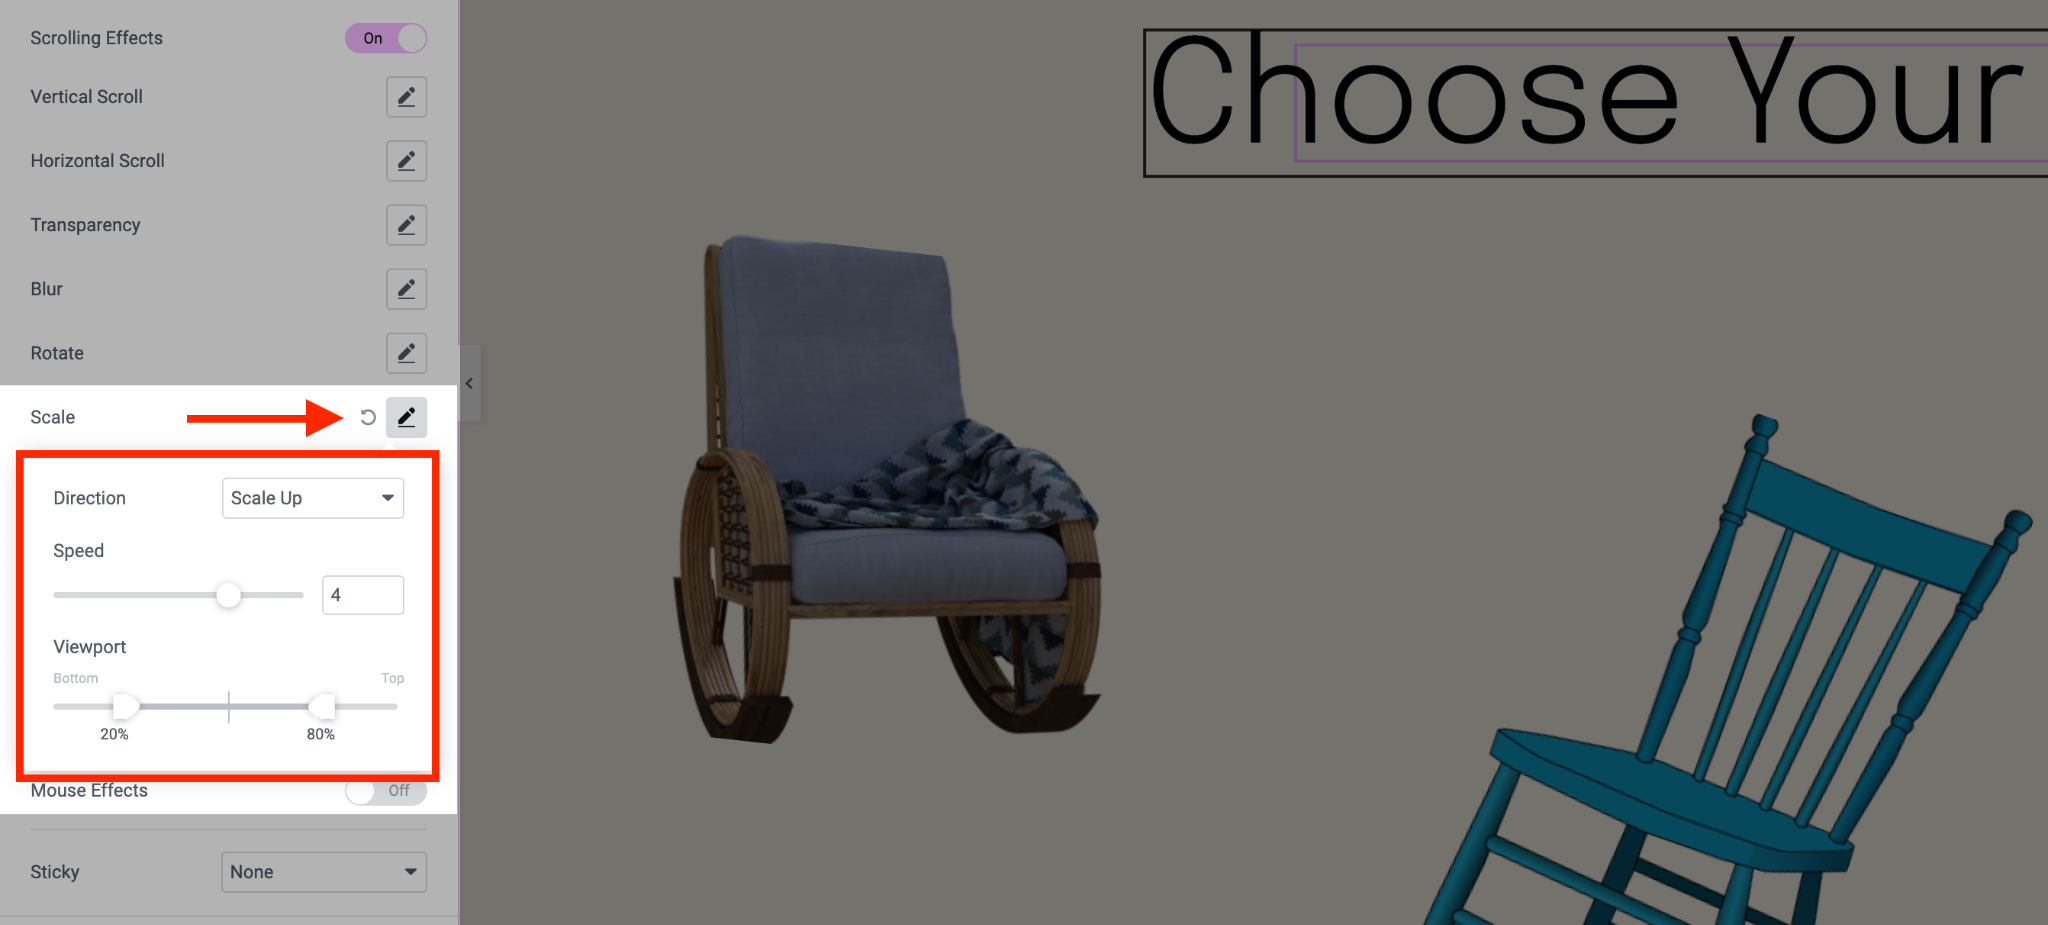
For each image, set the Position to Absolute in the Layout section under the Advanced tab.
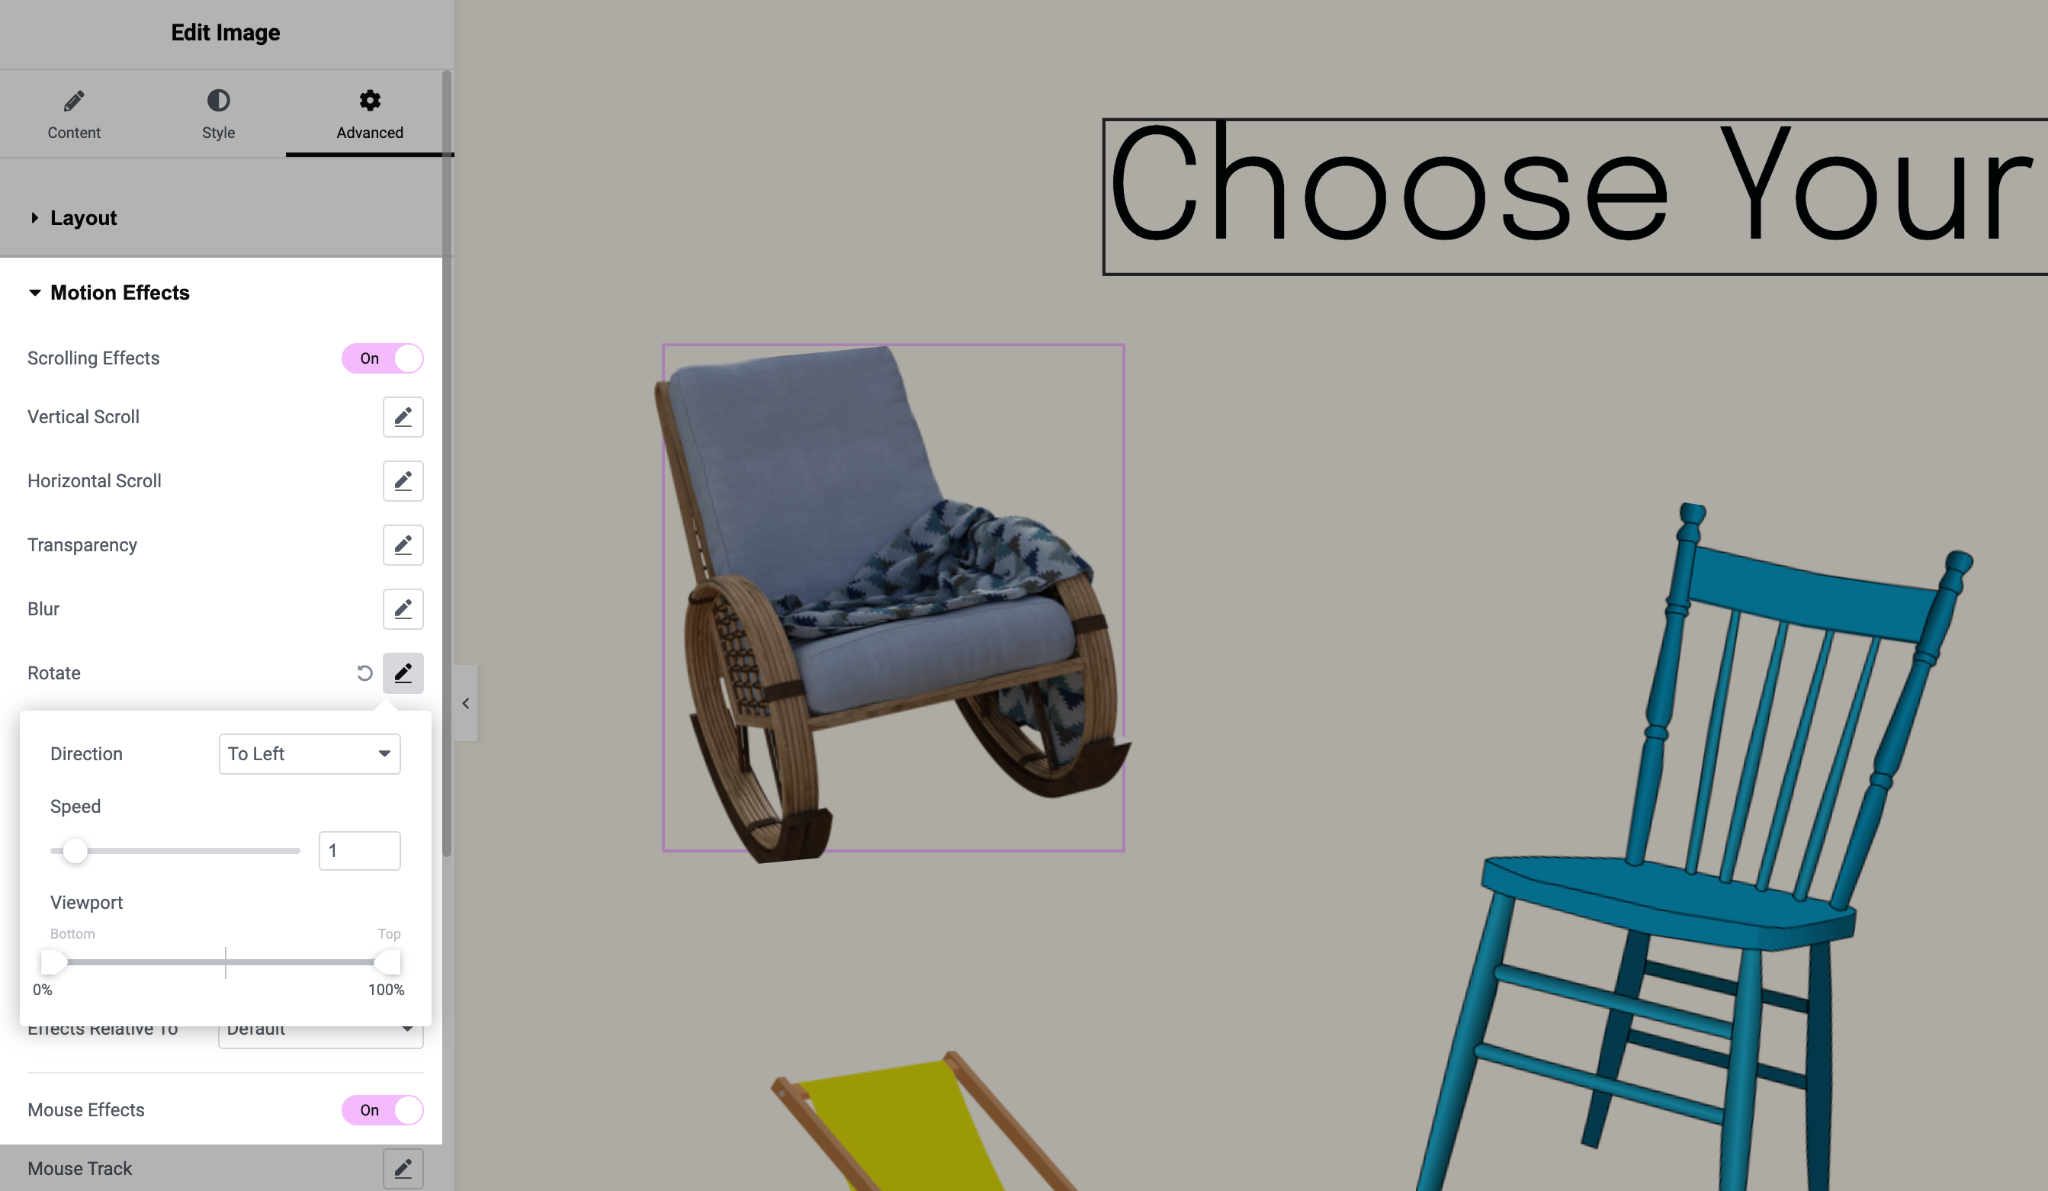
We then applied different motion effects to these images.
Here’s how we adjusted the Motion Effects settings:
| Rotate | Vertical Scroll | Scale | Mouse Effects |
|---|---|---|---|
| Direction: To Left Speed: 1 Viewport: 0%-100% | Direction: Up Speed: 4 Viewport: 46%-100% | Direction: Scale Up Speed: 4 Viewport: 20%-80% | Duration: Direct Speed: 1 |
Here’s the result.

You can tweak the settings to achieve the effect you desire, just keep in mind Elementor parallax effects work best on desktop screens.
If you want a similar experience across multiple devices, consider using a different solution, like the Astra theme.
Want to see how it works?
Creating Parallax Effect With Astra
Astra is a top-notch WordPress theme that offers the parallax effect right out of the box, no plugin required.
This simple yet powerful feature works seamlessly in the header area of your website, and looks great on both desktops and mobile devices.
What we love about using Astra for parallax scrolling is the flexibility.
You can display the effect conditionally based on user roles or page types, making it highly customizable.
Let’s quickly walk through how to create a parallax effect with Astra.
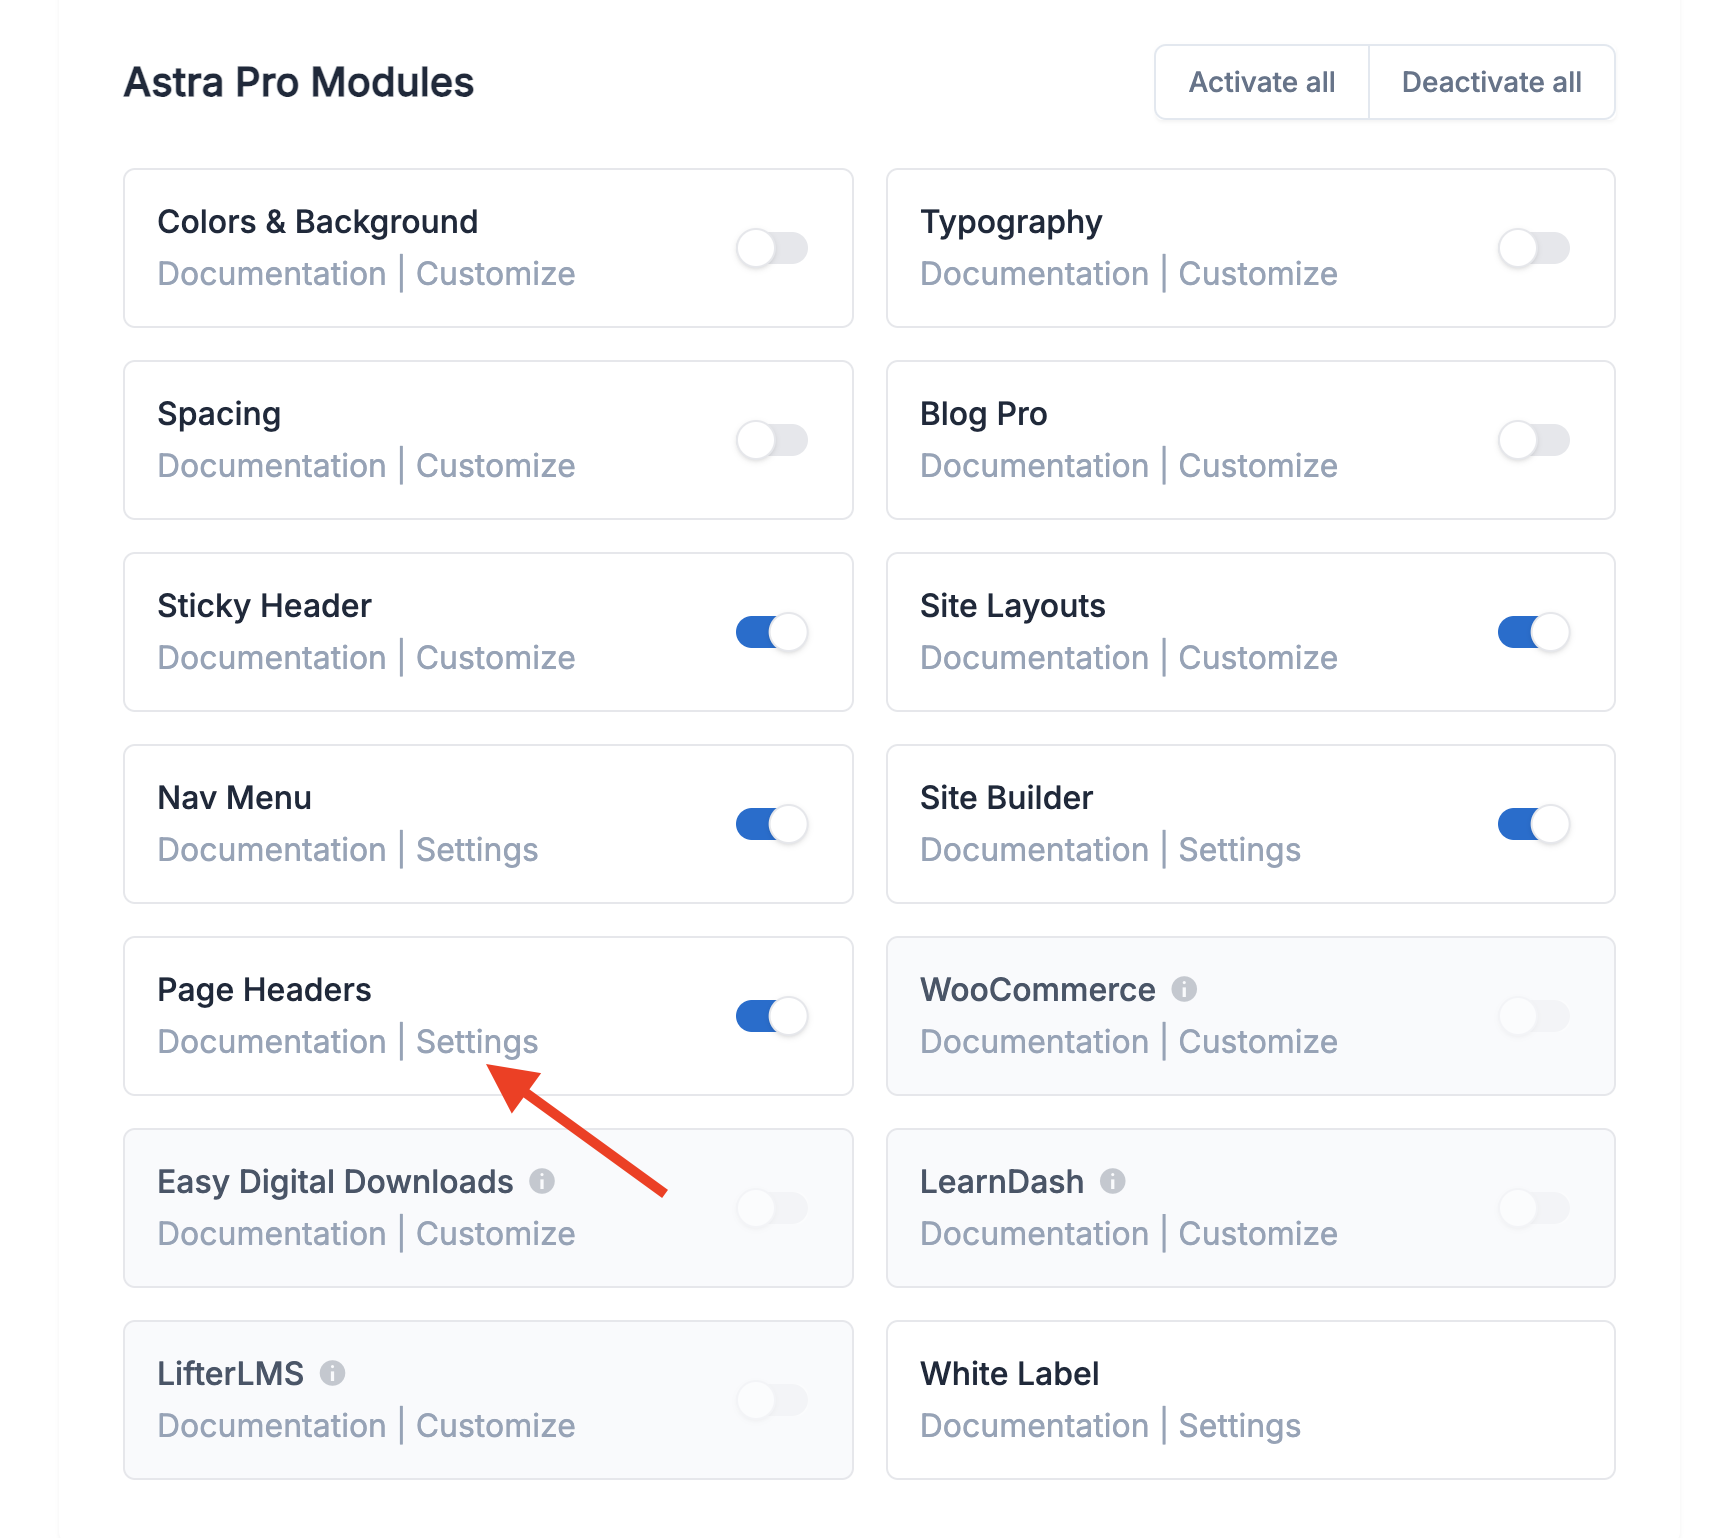
Once you install Astra Pro on your website, head over to the Astra Dashboard (Astra > Dashboard).
From there, enable Page Headers and click the Settings link to enter the page headers area.
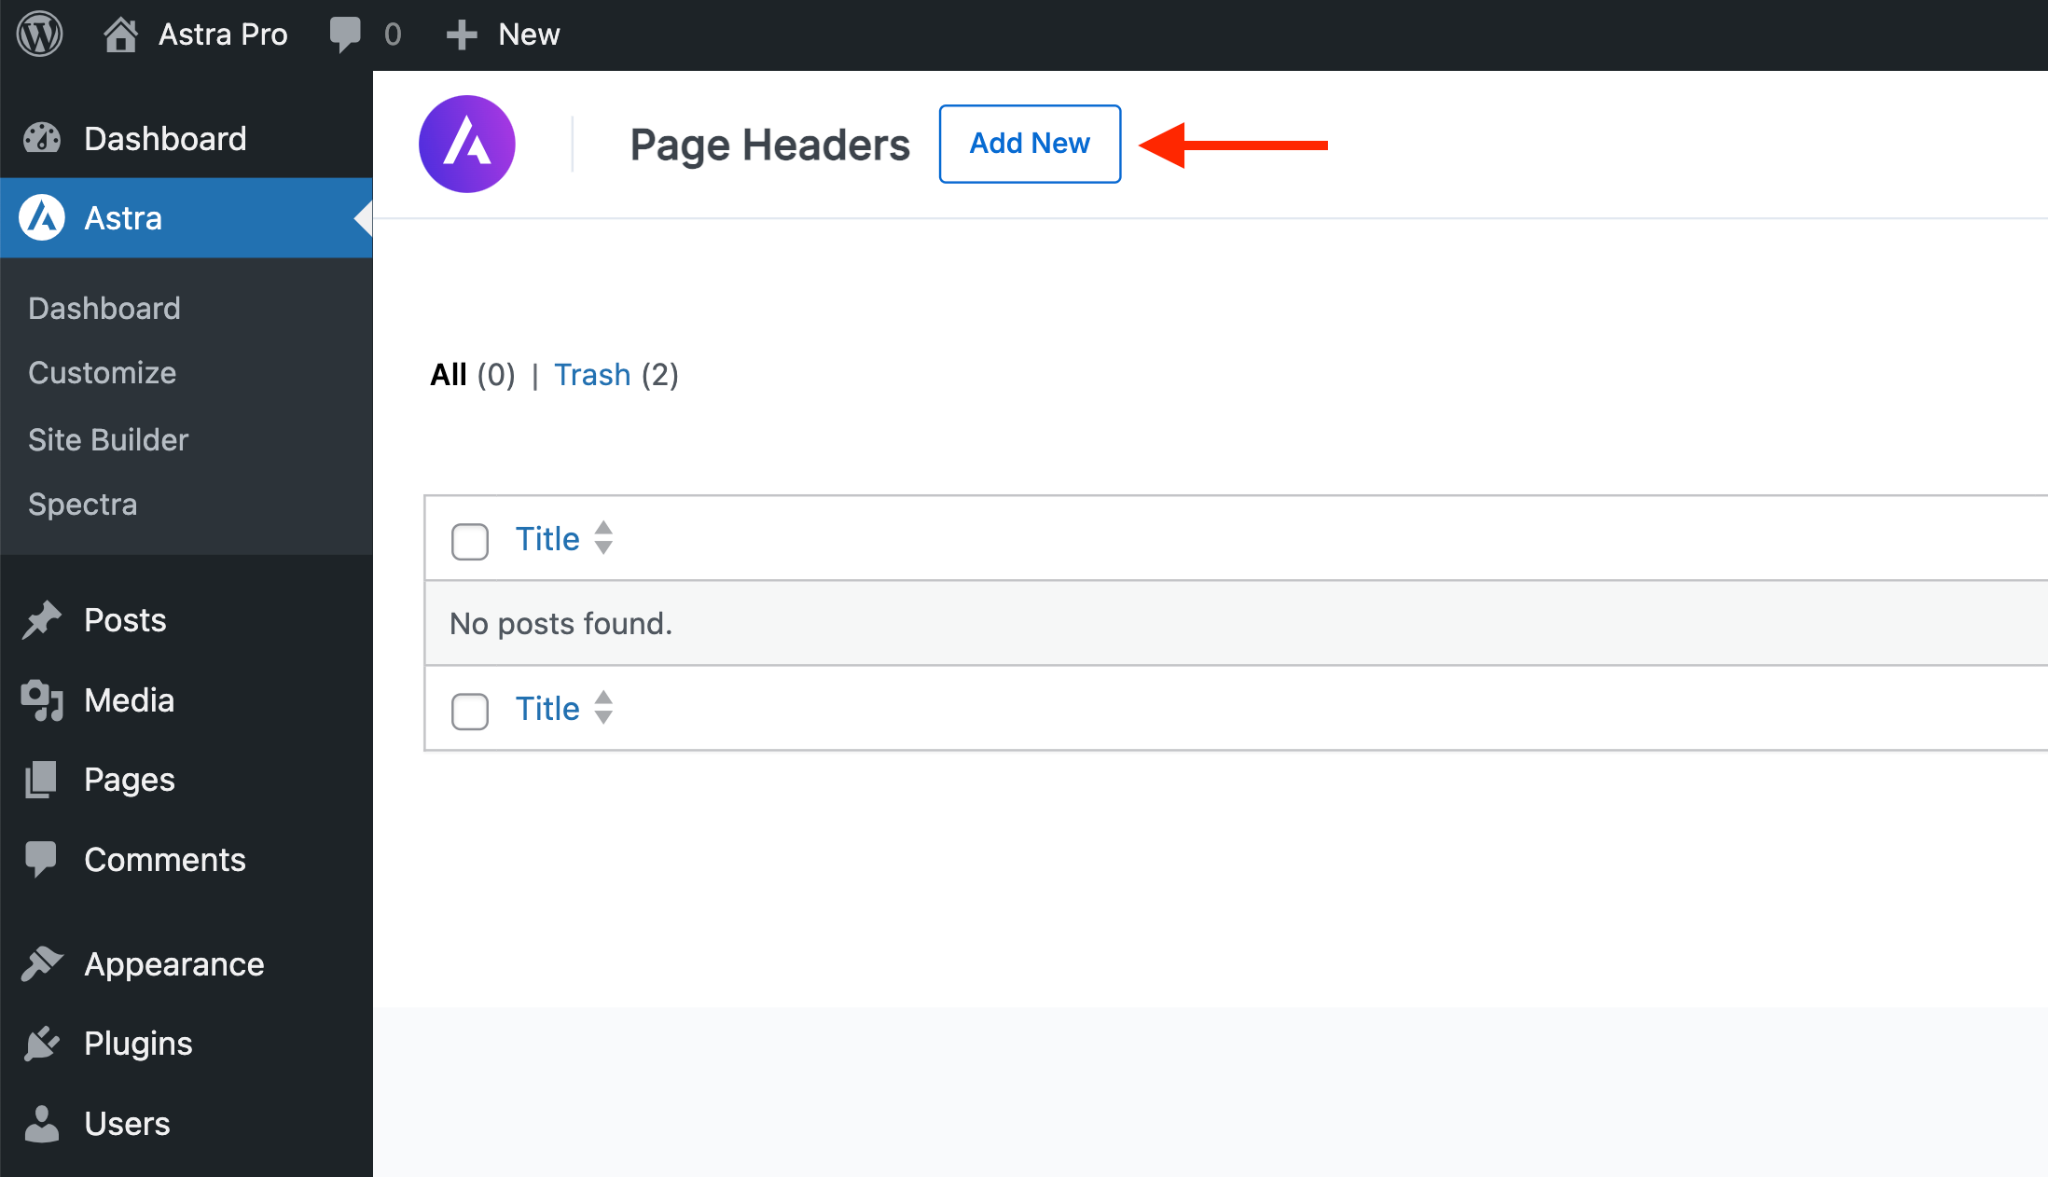
Click the Add New button at the top to create a new page header.
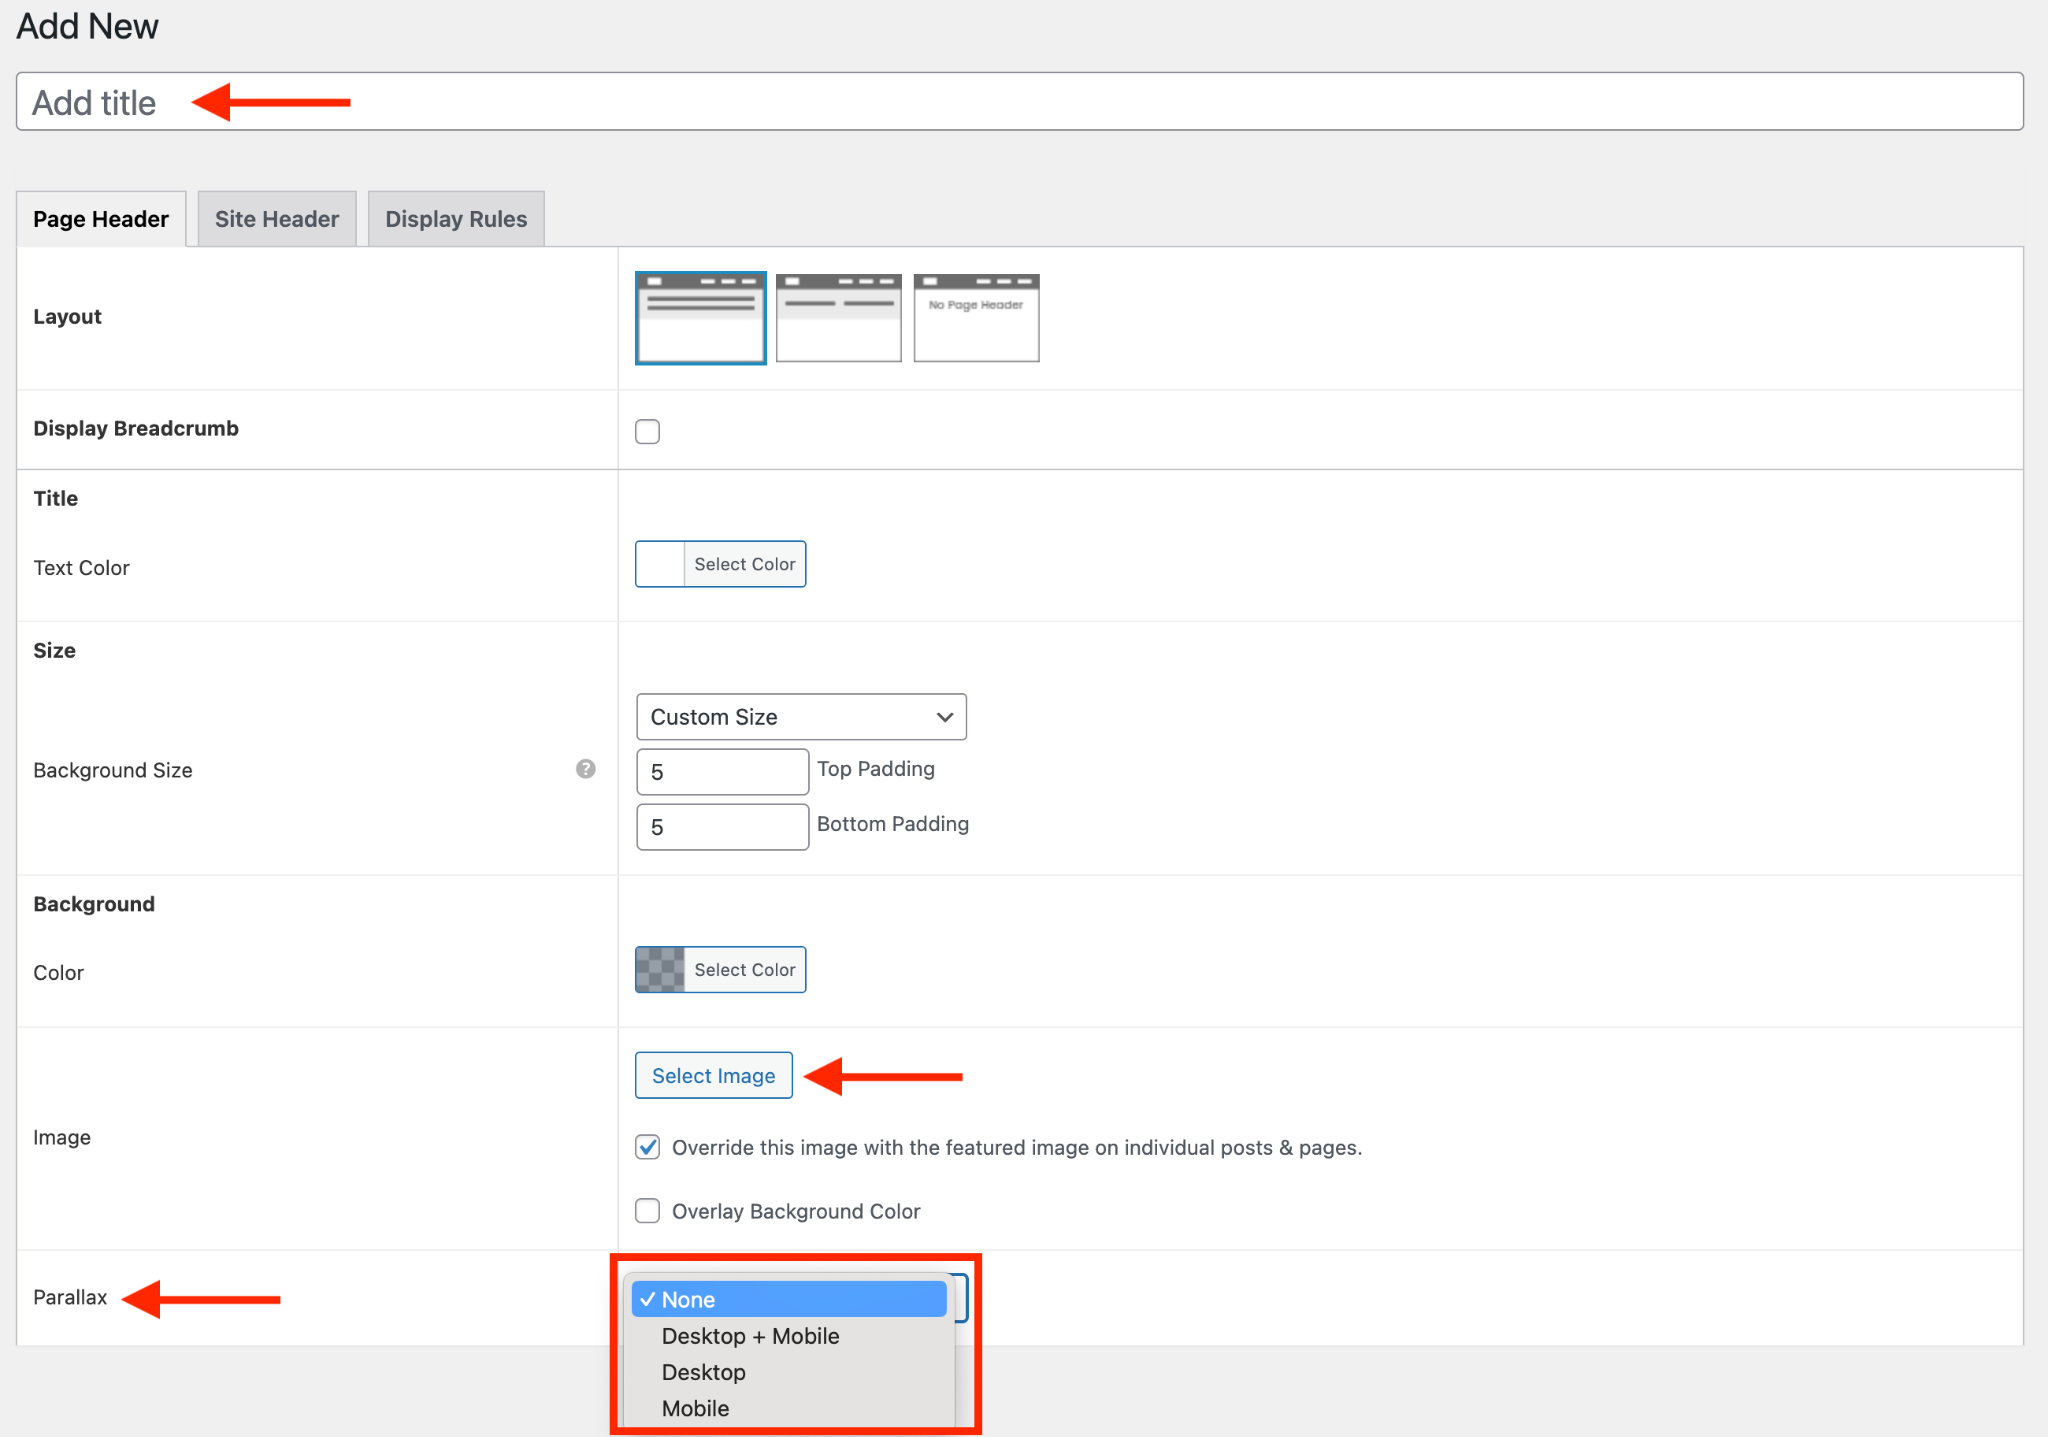
Here’s what you’ll do next:
- Name your page header.
- Choose the parallax effect setting, deciding whether it should work on desktops, mobiles, or both.
- Select your background image.
Next, choose the menu from the Site Header tab that should display in the header area.
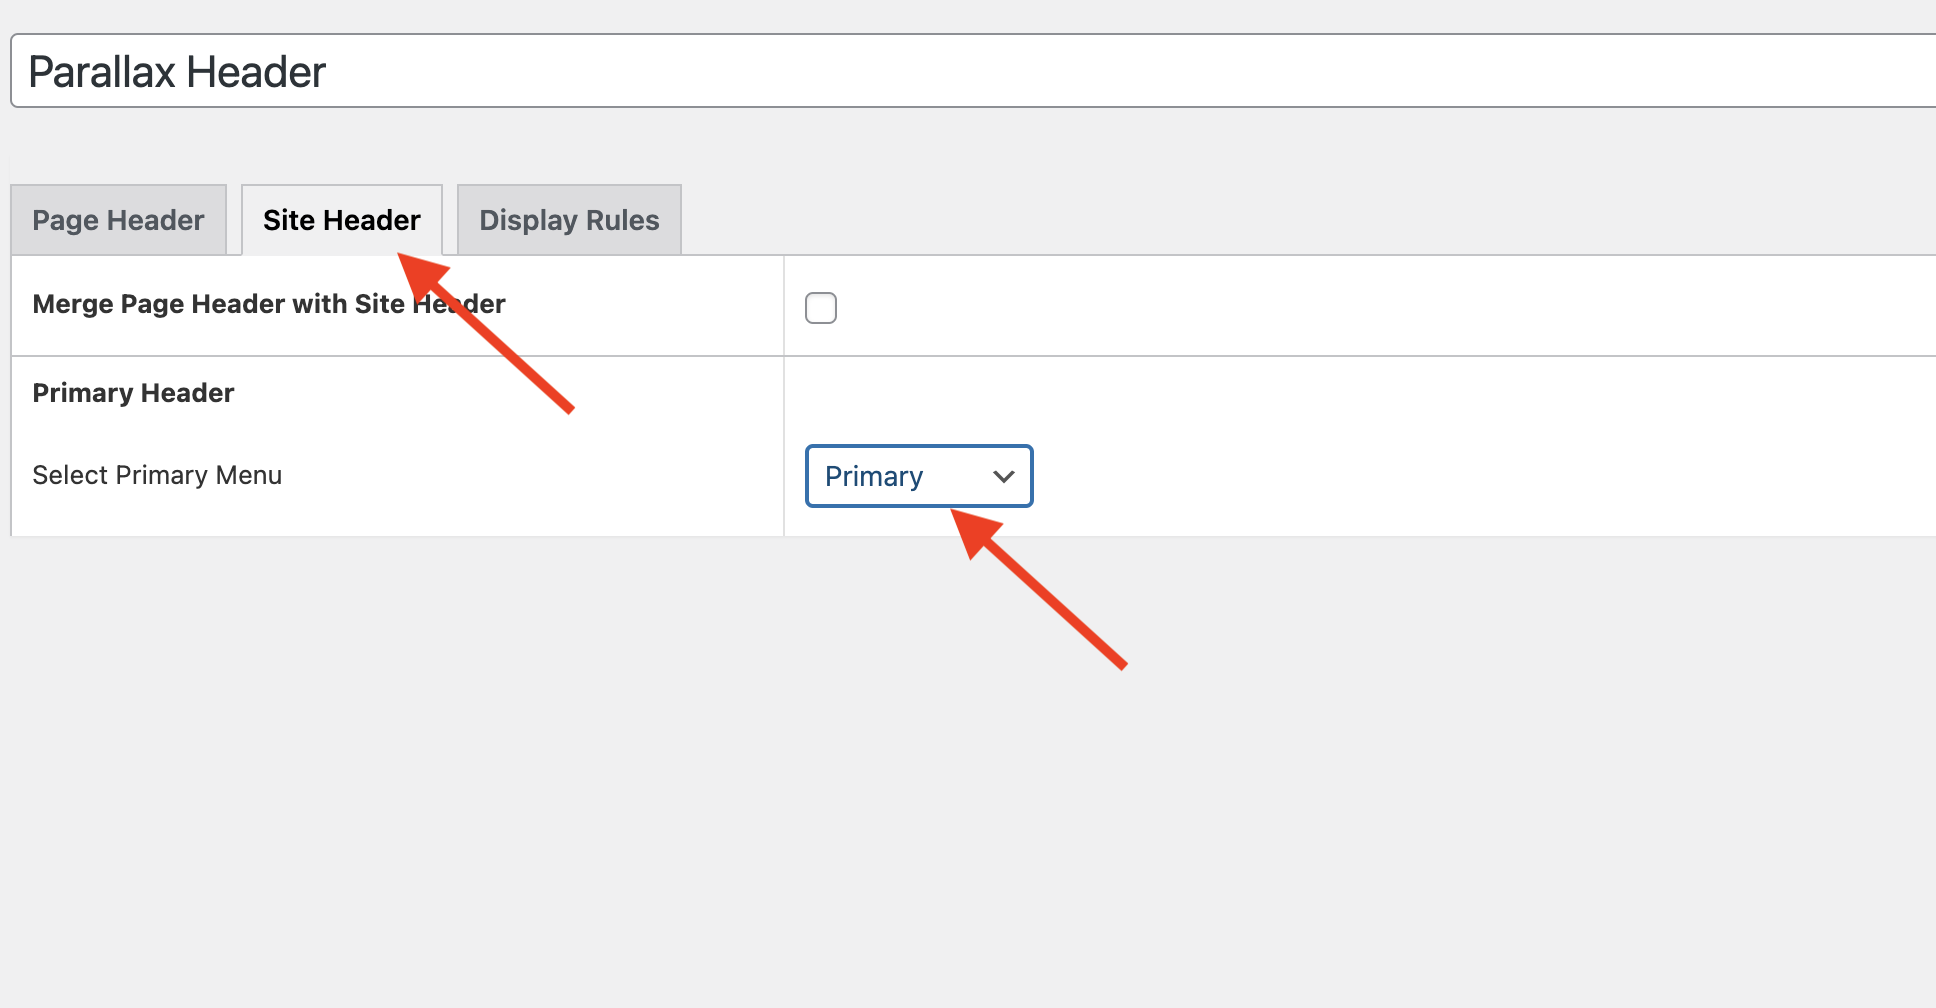
In the Display Rules tab, decide where you want to display this header with the parallax effect.
You can apply it to any page, category, or even the entire website—lots of options!
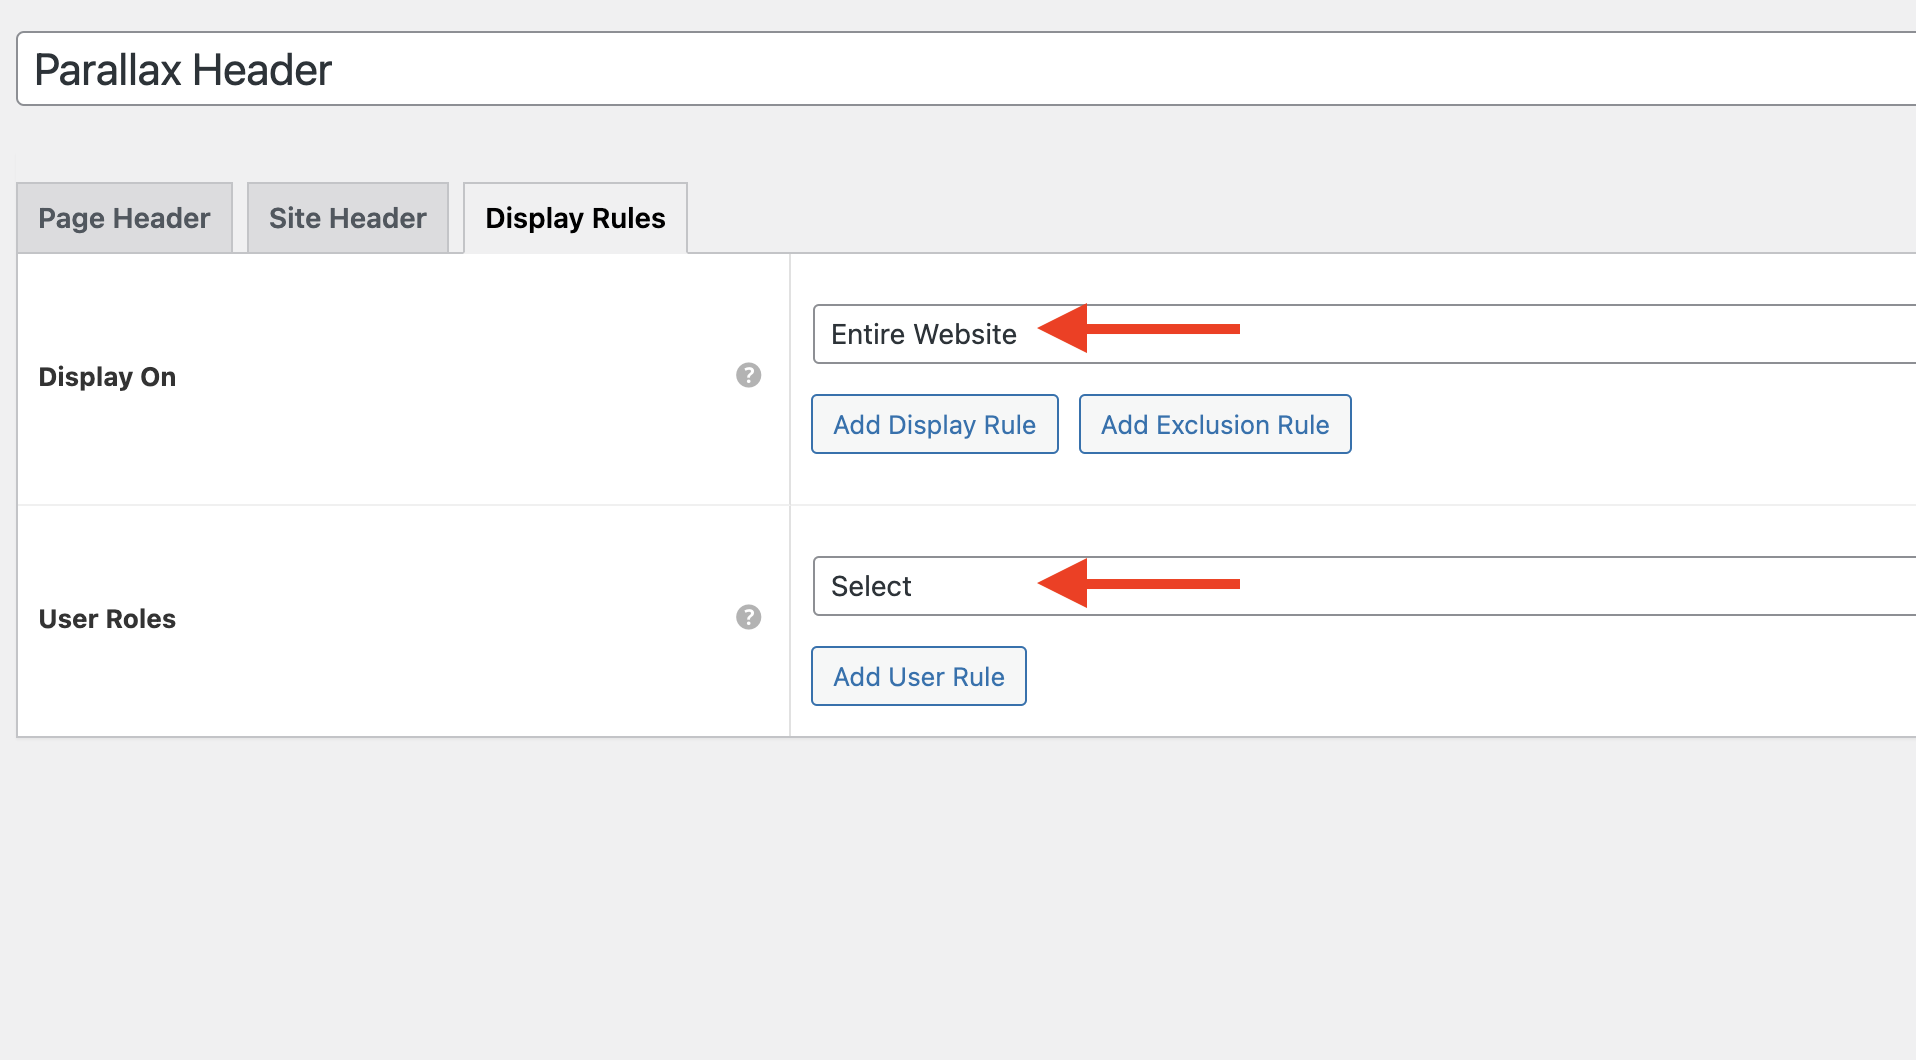
If you want only a specific user group to see the parallax effect, set it up under User Roles.
Once everything is set, click the Publish button in the top right corner.
And there you go—your header with the Astra parallax effect is live!

This Is Why You Should Use Parallax Effects

Parallax effects can do wonders for your website by making it more engaging and dynamic.
Here’s how they can benefit your site:
- Adds depth: Parallax creates layers of depth, making your site visually appealing.
- Grabs attention: The movement draws users in and encourages exploration.
- Enhances interaction: It guides visitors through your content in an interactive way.
- Improves user experience: It turns a simple site into a memorable experience.
- Highlights key areas: It simply directs focus where you want it.
- Adds surprise: It reveals content with a touch of surprise as users scroll.
Take Apple, for example. They often use parallax scrolling to showcase their products in visually stunning ways.
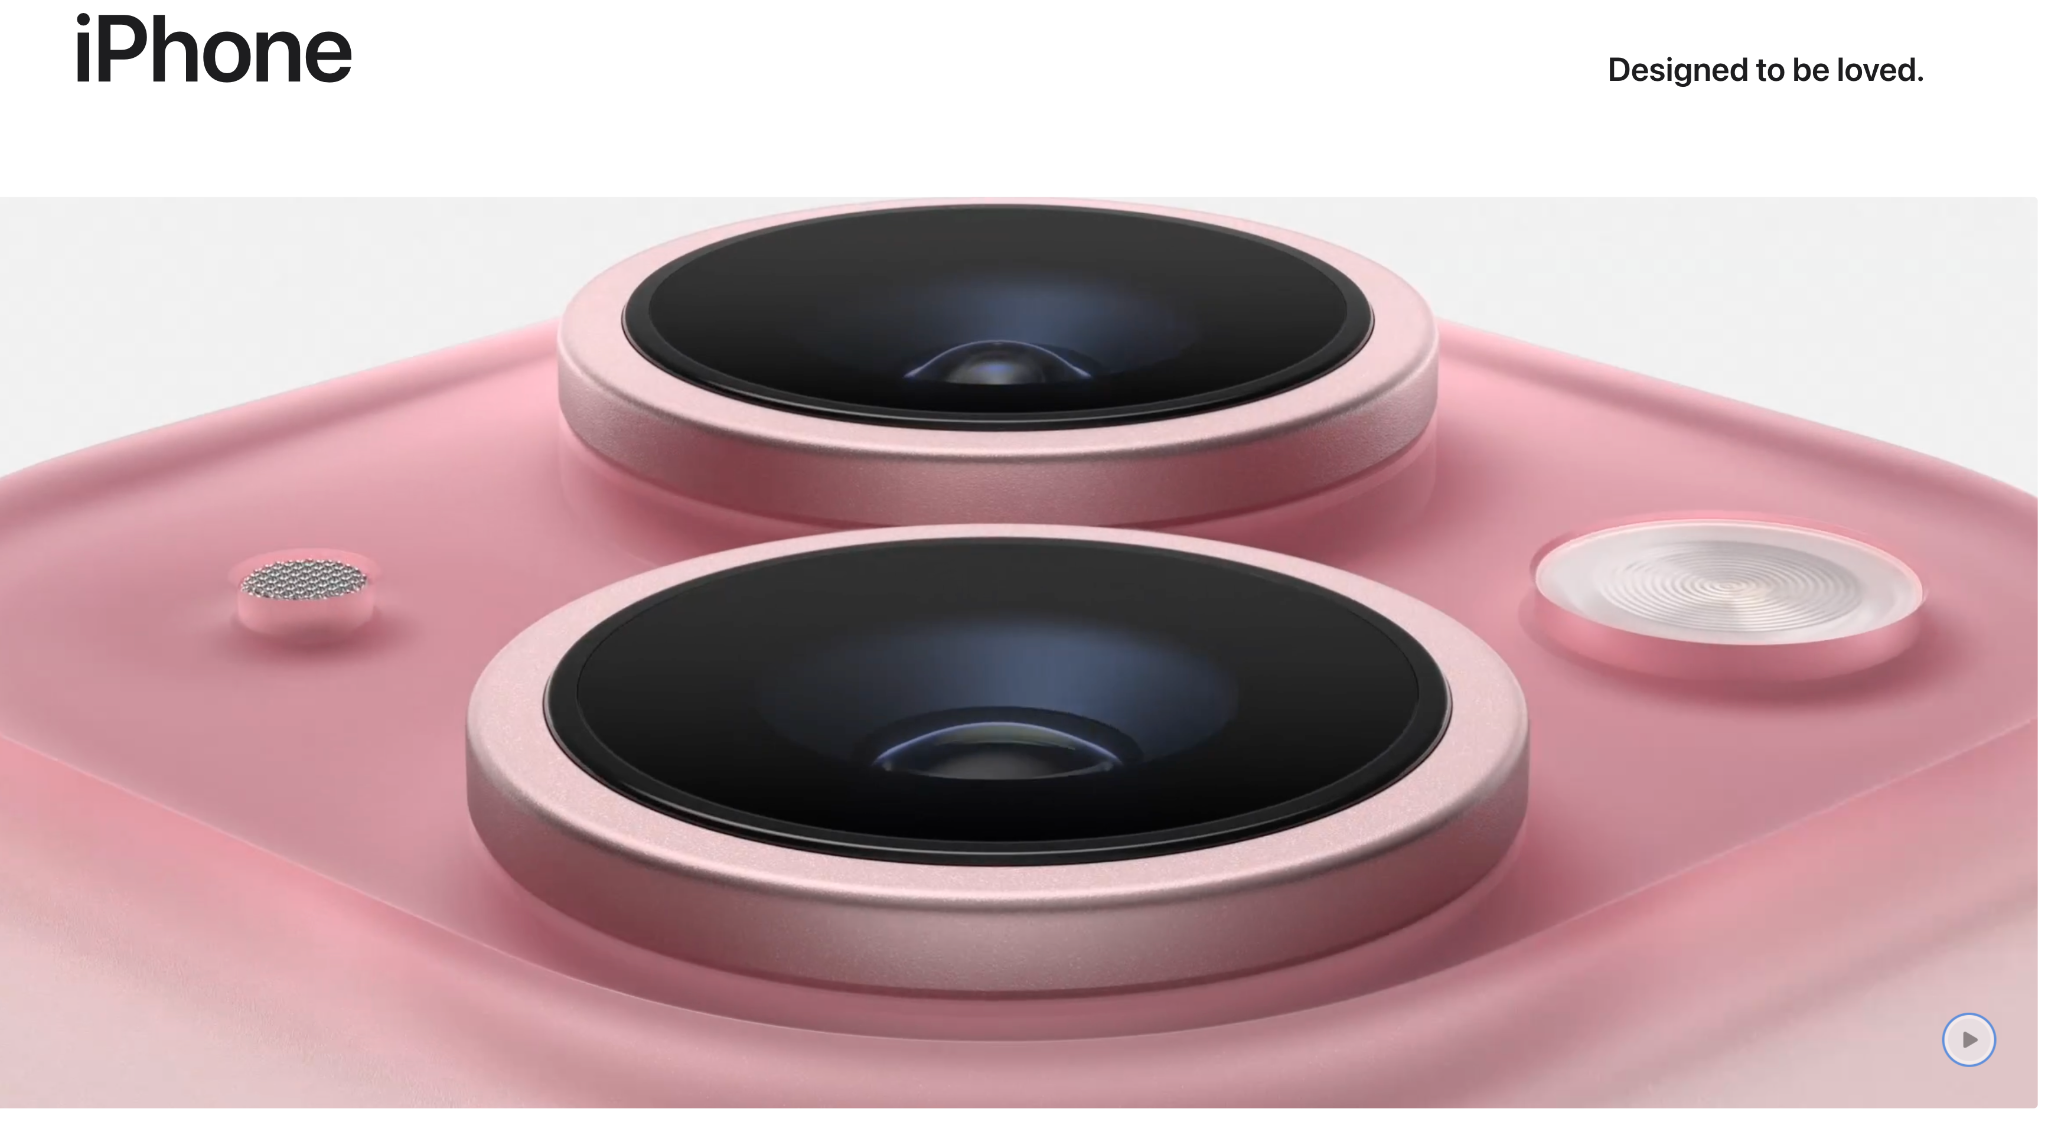
The iPhone pages use parallax effects to create a seamless experience that highlights the product’s features as you scroll.
The official website for the video game Firewatch also uses parallax effects to enhance storytelling.
The parallax scrolling draws users into the game’s world, creating an immersive preview of the experience.
Similarly, Spotify’s “Year in Review” pages use parallax effects to guide users through their listening history, making the content more interactive and engaging.
These examples show how parallax effects can elevate a website from a simple digital brochure to a dynamic, engaging experience that truly resonates with users.
Conclusion
By now, you’ve seen just how easy it is to add parallax effects to your WordPress site using Elementor.
Whether you’re using the free or pro version, Elementor parallax effects can truly bring your site to life.
These effects don’t just make your site look cool—they guide your visitors through your content in a way that’s engaging and memorable.
Ready to use stunning parallax effects? Astra has got tons of Starter Templates waiting for you!
Choose your favorite or easily customize them with Elementor to match your style.


So why stick with a static site when you can create something dynamic and visually stunning?
Give these techniques a try, and watch your website’s visual appeal—and user engagement—skyrocket.
Which parallax effect are you excited to add to your site? Share your thoughts in the comments!

No Content
Disclosure: This blog may contain affiliate links. If you make a purchase through one of these links, we may receive a small commission. Read disclosure. Rest assured that we only recommend products that we have personally used and believe will add value to our readers. Thanks for your support!


is it possible to use the parallax feature on elementor with an astra installed theme? (newbie to website building)
Hello Layla,
Yes, definitely Elementor works flawlessly with the Astra theme. You can follow the above steps and you will easily be able to achieve the Parallax effect.
Hello, the parallax is responsive ? Did he working on mobile and tablet with pro account ?
Thanks !
Do you have other suggestions for free plugins? The one mentioned here hasn’t been updated in 5 years and the support comments mention that people have had security issues with it. Alternately, any chance this will be added to Ulitimate Addons for Elementor? (This is the ONLY thing I really need and can’t get in your addon pack.)
Hey Angie, we do not have any plans to introduce the Parallax effects in the UAE plugin. You might want to consider Elementor’s Parallax effect solution as shared here in this article – https://spectra-test.wpastra.com/guides-and-tutorials/parallax-effects-with-elementor/.
Hope that helps! 🙂
Is there still no way to achieve a slow scroll parallax effect with elementor? Installing a 5 year old plugin does seem like an ideal workaround.
The ideal was is with using the Elementor Fre and Pro. You might find other tools and options or even using the Block Editor.
I have already built my homepage using Astra builder, is it possible to to use elemantor on top of it? I am afraid I will breaking the page if I do so. I am not sure, could. you please confirm this?
Hello there, if you have built a page with Gutenberg or Block Editor it is not recommended to use Elementor on top of it. You need to completely build the page using Elementor or Block Editor. I hope that helps.